EucBuddy — User Manual
Everything you need to use your EucBuddy — buttons, favorite wheels, the six ride screens, MyBuddy and Zap Dash, weather, ride history, WiFi, charging, charge control with a smart plug and updates. Covers M5Stick-S3 and LilyGO T-Display-S3.
Checked against firmware 0.5.68. Available builds may differ by device and channel. On-device labels are in English on both boards.
- 1Device & buttons
- 1.1T-Display-S3 battery
- 2First start & pairing
- 3Favorite wheels
- 4The six ride screens
- 5Button cheat-sheet
- 6Menu — every option
- 7MyBuddy
- 7.1Zap Dash — play & controls
- 8Weather
- 9WiFi config panel
- 10Charging
- 10.1Wheel charging monitor
- 10.2Charge control & smart plug
- 10.3Plug calibration
- 11Battery, sleep & power-off
- 12Rides — ride history
- 13Firmware updates
- 14FAQ
Device & buttons
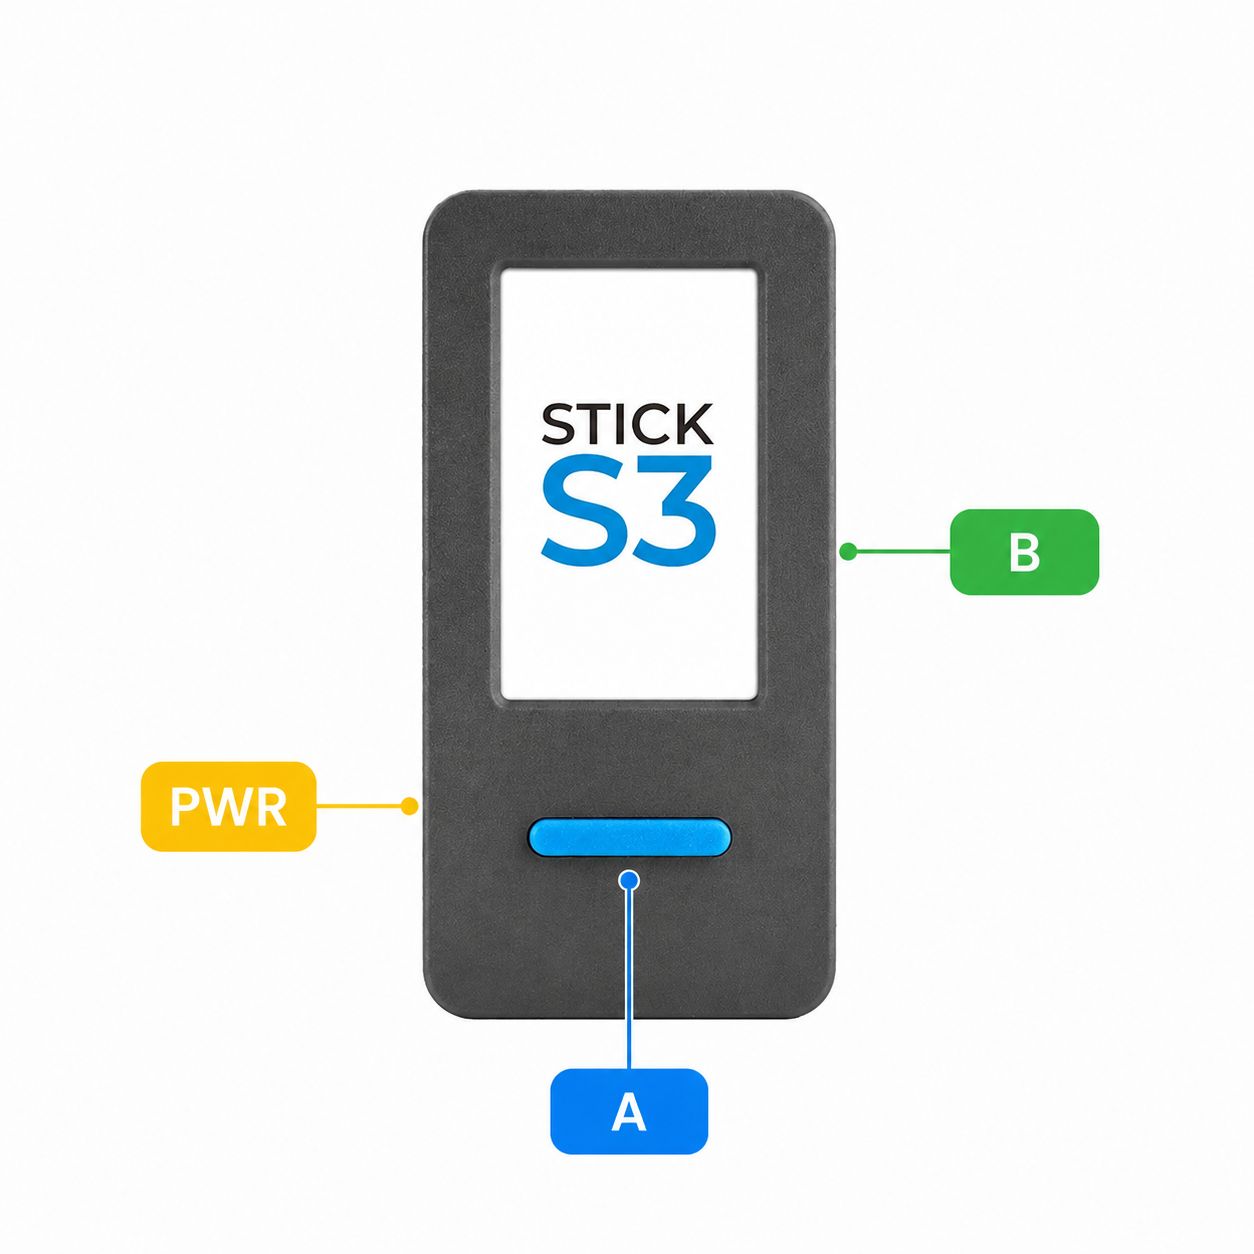
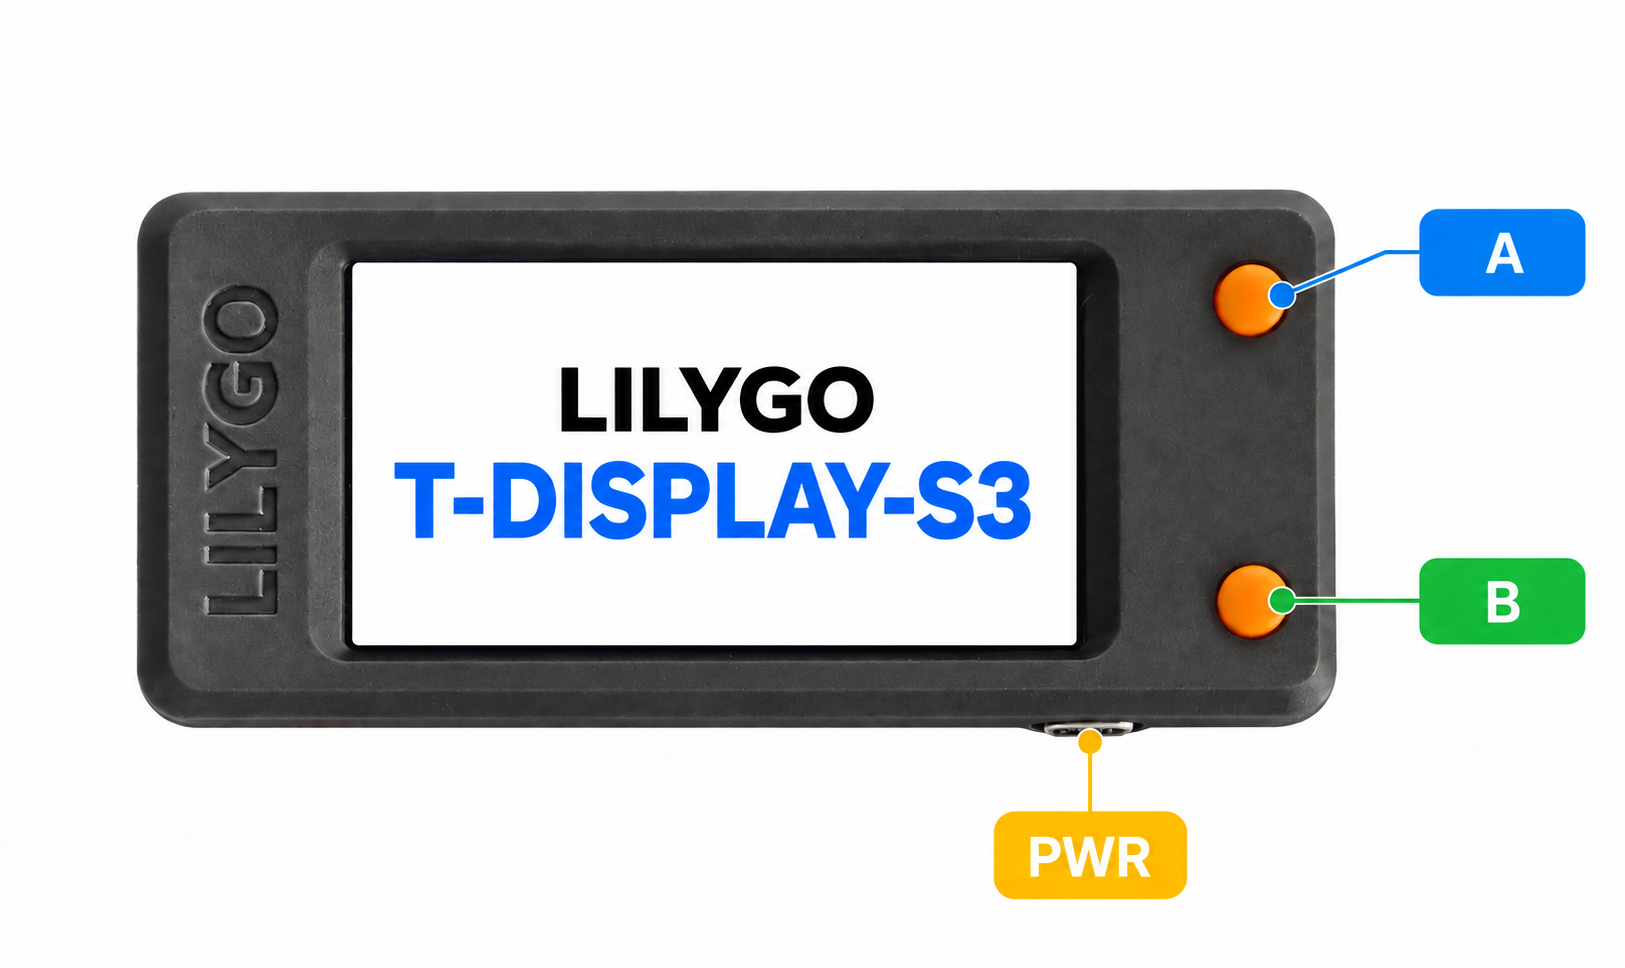
EucBuddy runs on M5Stick-S3 and LilyGO T-Display-S3. Both use the same A/B actions; their button placement and power controls differ.
| Part | What it does |
|---|---|
| A Main button | Large front button on StickS3; upper orange button on T-Display-S3. Short press = next / select; hold ~1.2 s = open menu. |
| B Action button | Small side button on StickS3; lower orange button on T-Display-S3. Short press = confirm / back (context-dependent, e.g. headlight, horn or trip reset — the ride-screen action is configurable, see Section 6). |
| PWR Power | On StickS3, the side button turns on, wakes and switches off the device. On T-Display-S3, use either A or B to wake from sleep; its reset key is handled as a sleep request during normal operation, not a battery-disconnect switch. Both boards have Power off in the menu. Section 11. |
| USB-C | Charging. Plugging into a powered-off device opens the charging screen (Section 10). |
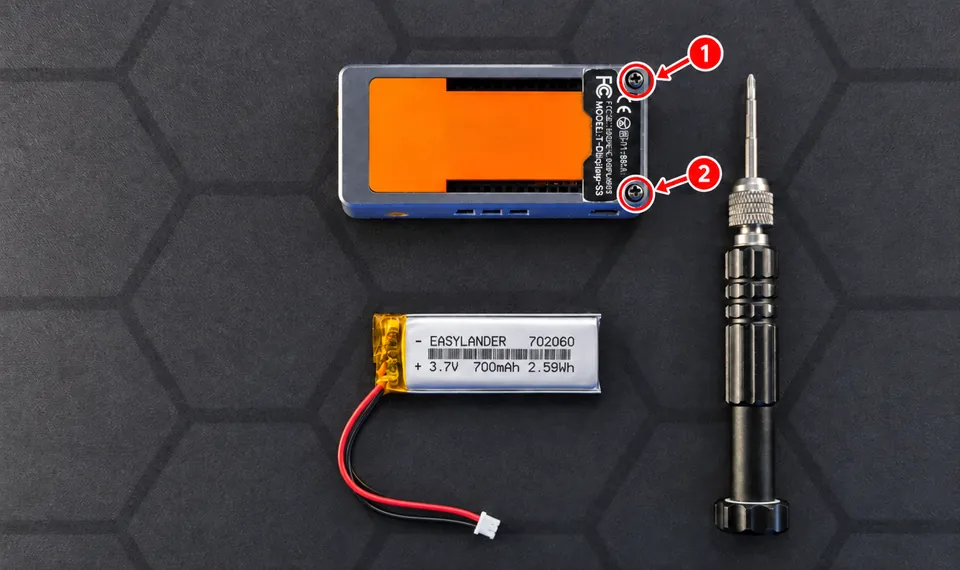
T-Display-S3: fitting the battery
The T-Display-S3 case arrives without its battery: you fit it once, with a small Phillips screwdriver, in about five minutes. Use the battery listed on the Get one page — other sizes and connectors will not fit. M5Stick-S3 has a built-in battery and needs none of this.
The photos show a 702060 test cell. Buy the 702050 battery from the Get one link — the size printed on yours will differ from the photos.
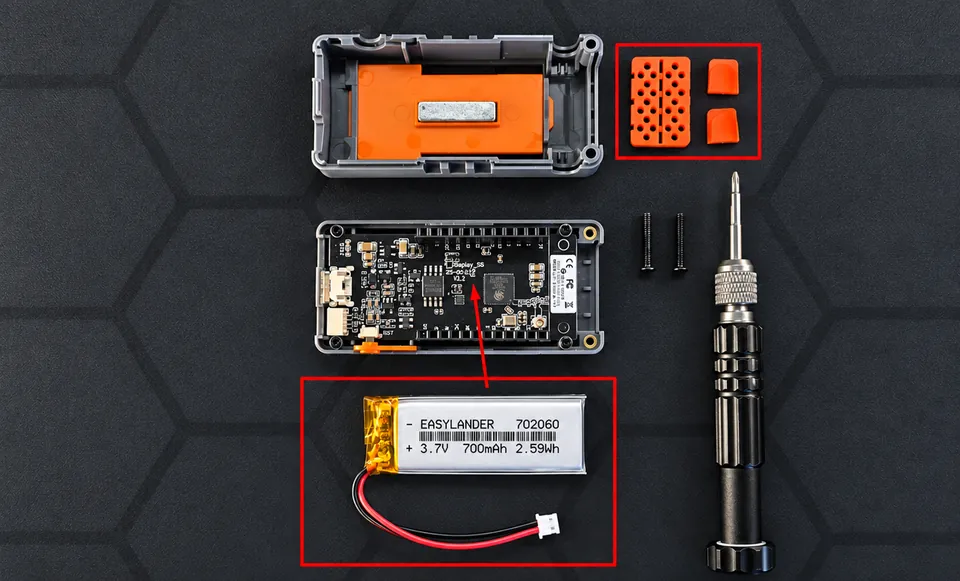
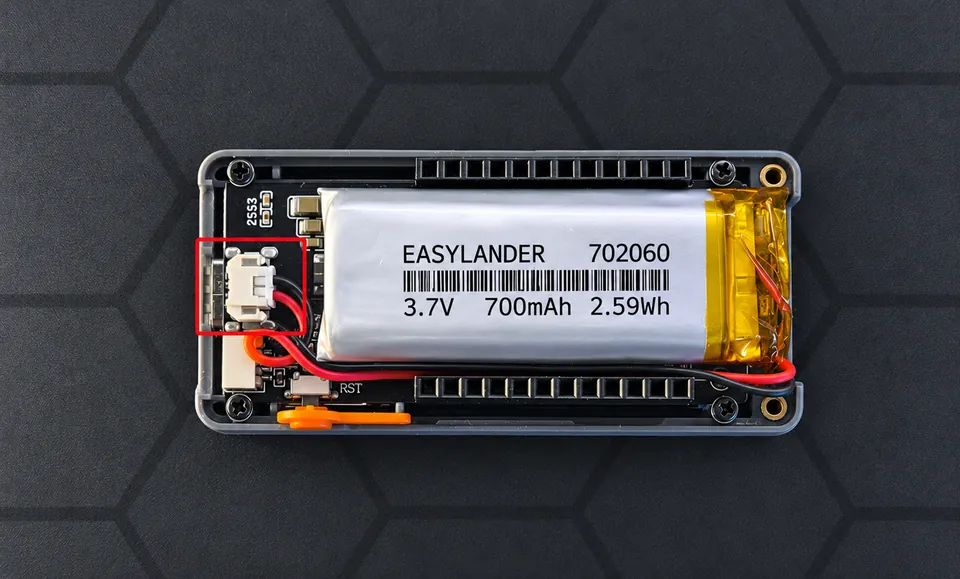
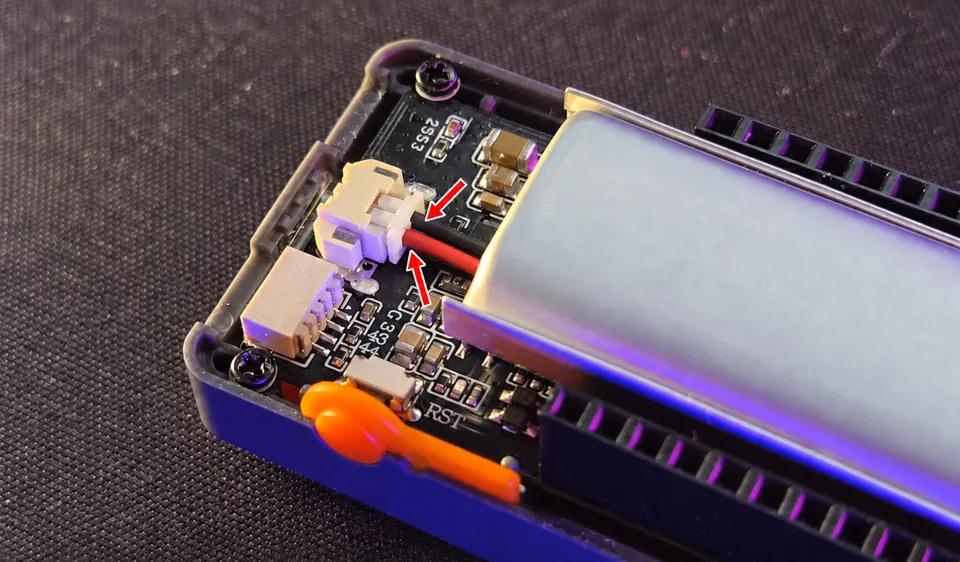
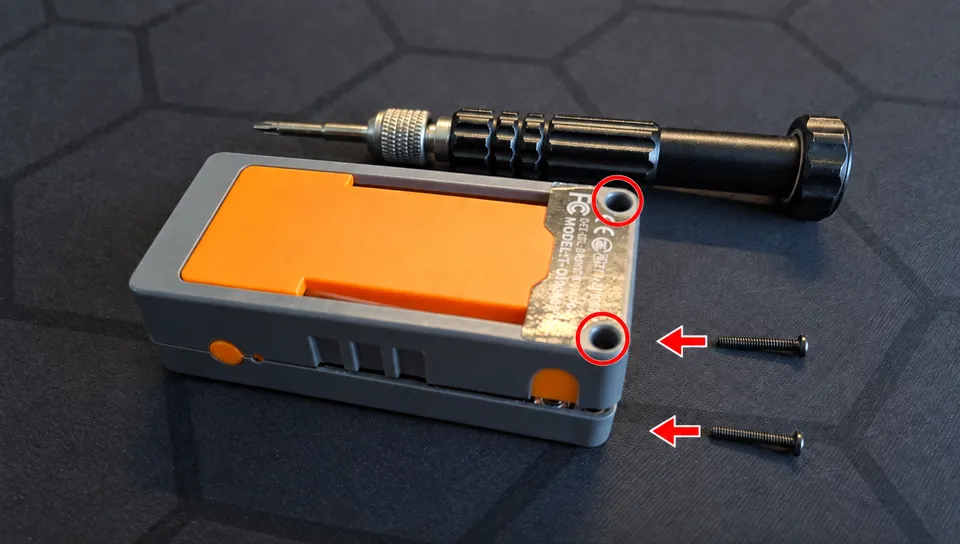
Then charge it over USB-C (Section 10) and continue with first start & pairing.
First start & pairing
1 · Turn it on
On StickS3, press PWR. On T-Display-S3, connect USB-C for the first start; use A or B to wake it later. After the splash you'll see the scan screen with an animated radar — EucBuddy is looking for nearby wheels.
2 · Pick your wheel
Found wheels appear in a list (the "SCAN (n)" counter is at the top). Press A to move between entries.
3 · Connect
Press B to connect to the highlighted wheel. EucBuddy remembers it and will reconnect automatically next time.
Through the EUC World app
A phone running EUC World can hand its telemetry on over Bluetooth, so EucBuddy can ride along with a wheel it has no decoder of its own for. Turn the app's BLE server on and it appears in the scan list as EUC World …; connect to it exactly like a wheel.
- You get speed, wheel battery, distance, temperature and the energy used — rides are logged just like any other.
- The app's link doesn't carry pack voltage, current or PWM, so those read “--” (and no odometer total, since the count is the app's ride, not the wheel's life).
- EucBuddy only ever listens here — the headlight, horn and speed limiter need a direct link to the wheel and do nothing over this one.
Favorite wheels
Star the wheels you ride so they're always easy to find. Favorites jump to the top of the scan list and get a star ★. You can star up to 32 wheels.
| Action | How |
|---|---|
| Add / remove a star | On the scan list, hold B on the highlighted wheel (high beep = starred, low = unstarred). Hold again to remove. |
| Give it a name | On the WiFi panel's My Wheels page (Section 9) type a custom name for the wheel and press Save. |
A custom name then shows in place of the Bluetooth name on the scan list, and top-left on the Dashboard instead of the vendor (e.g. "My Sherman" instead of "Veteran"). Long names scroll by themselves on the highlighted row.
The six ride screens
Once connected, a short press of A cycles six screens (default order): Dashboard → Custom 3 → Power → Trip → Stats → Custom 1 and back. You can reorder them or hide ones you don't use in the WiFi panel (Section 9). Two of the six are yours to configure — Custom 3 (three values) and Custom 1 (one value) — under Dashboard setup → Dashboard config (Section 6). Each screen is the same idea — a different headline value:
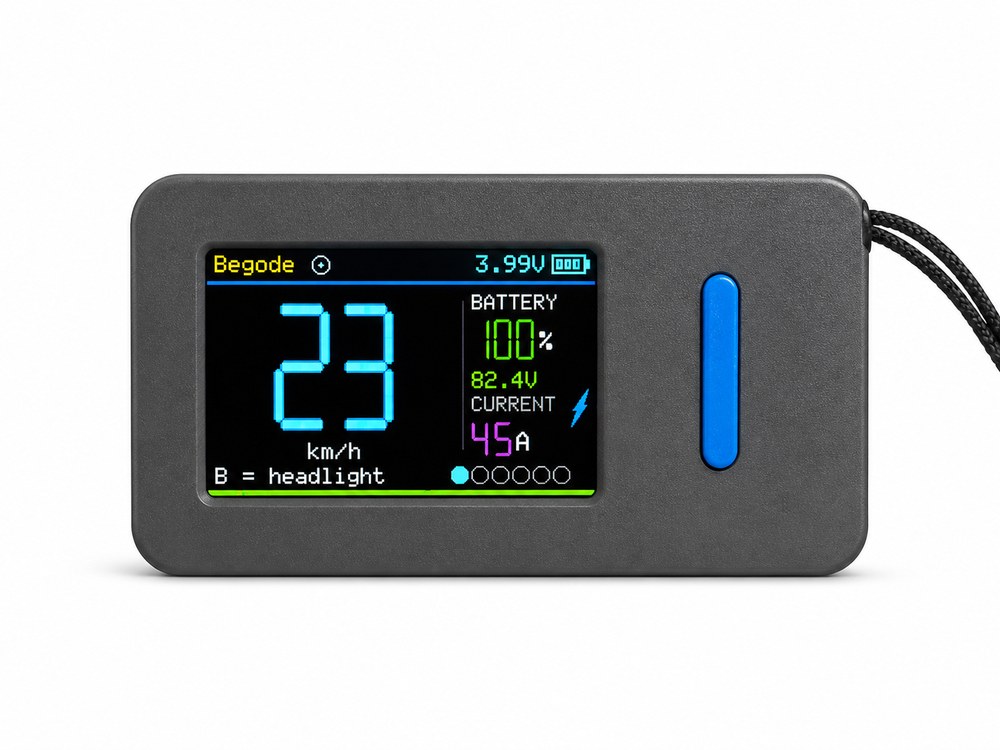
1 · Dashboard — live ride
- Big speed (cyan below 30 km/h, yellow from 30, red from 45 — keyed on real km/h, not miles).
- Wheel battery %, voltage and current.
- A short press of B runs your Press B action — headlight by default (if your wheel supports it), or horn. Set it under Dashboard setup (Section 6).
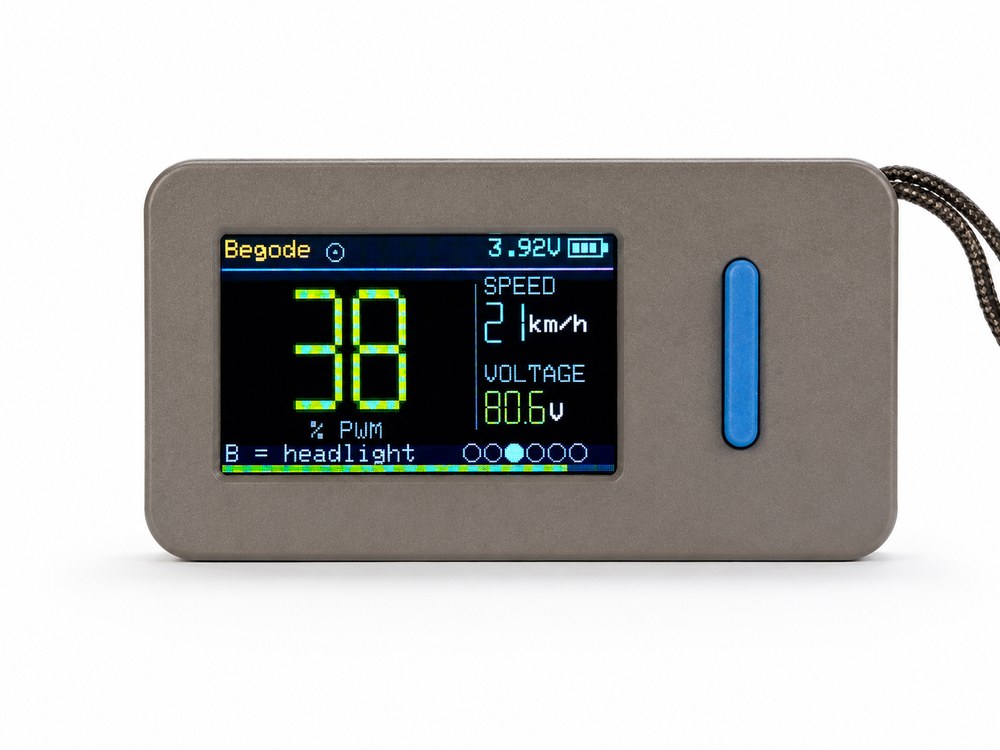
2 · Custom 3 — three values, your choice
- One big value on the left, two small ones stacked on the right — you pick all three.
- Out of the box it's the classic PWM safety screen: PWM % big (how hard the motor works; near 100 % = near a cut-out) with speed and voltage beside it. green <80 · yellow 80–90 · red 90+ (back off).
- Change any slot under Dashboard setup → Dashboard config or in the WiFi panel; short B = your Press B action (headlight by default).
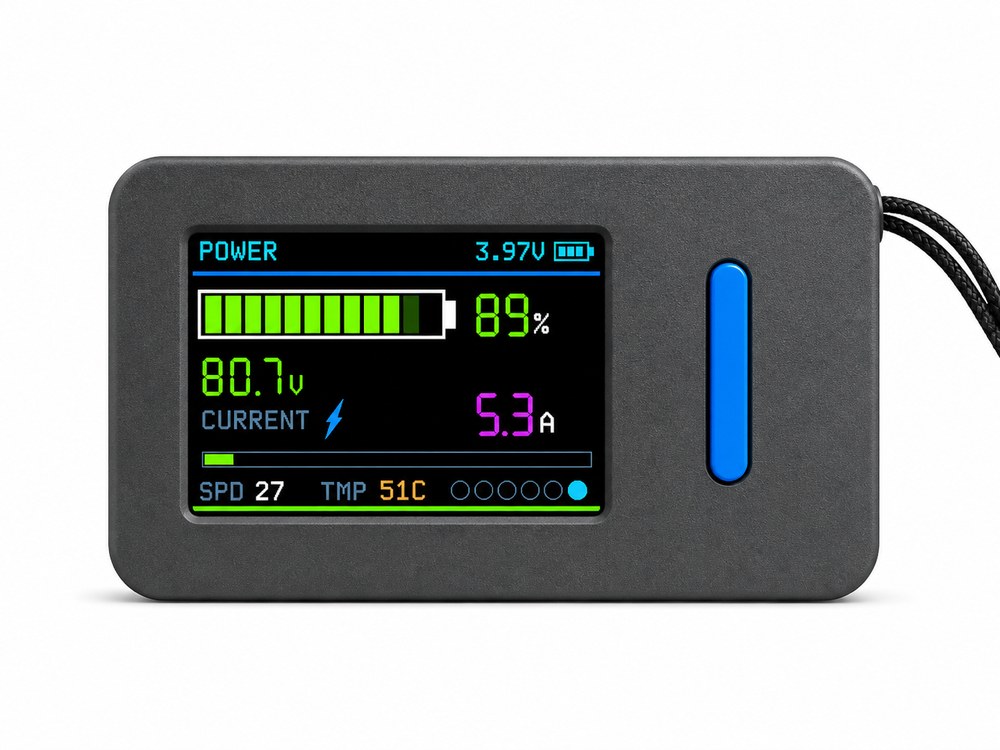
3 · Power — battery & output
- Tall battery gauge and percentage down the left, with voltage and watts below it. The watts are what the pack is actually delivering, and take the same colours as the current below — pink drawing, cyan on regen.
- Current is the hero on the right — pink when drawing, cyan on regen — over a slim 0–100 A load bar.
- Speed and temperature sit in the footer.
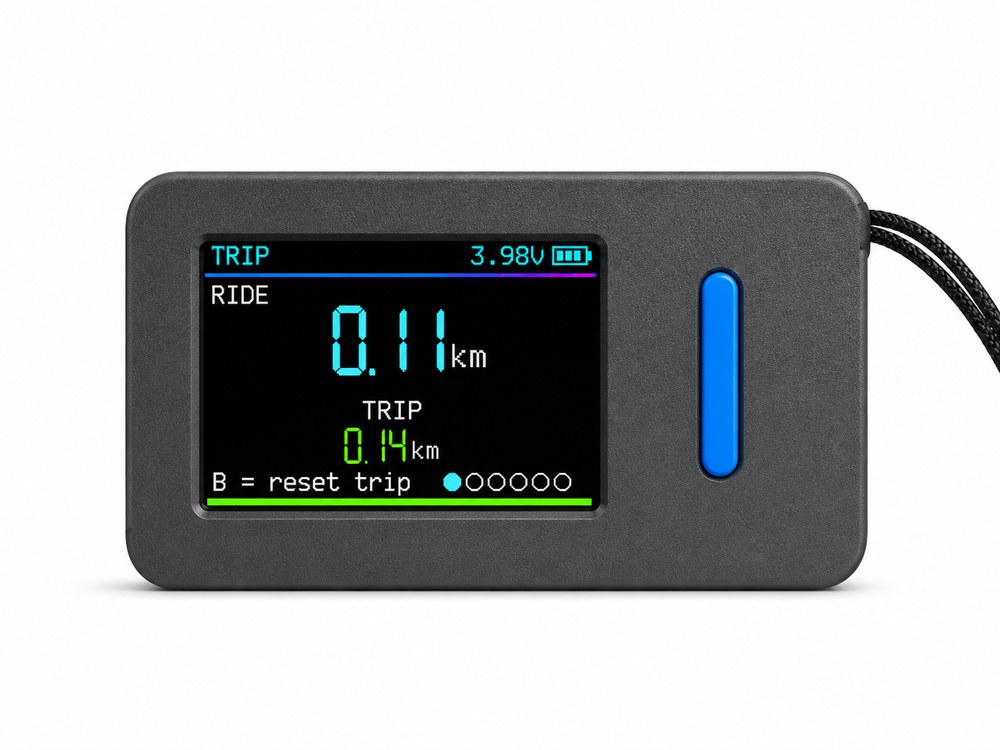
4 · Trip — distance
- RIDE — distance of the current ride.
- TRIP — resettable counter.
- Press B to reset the trip (confirm popup).
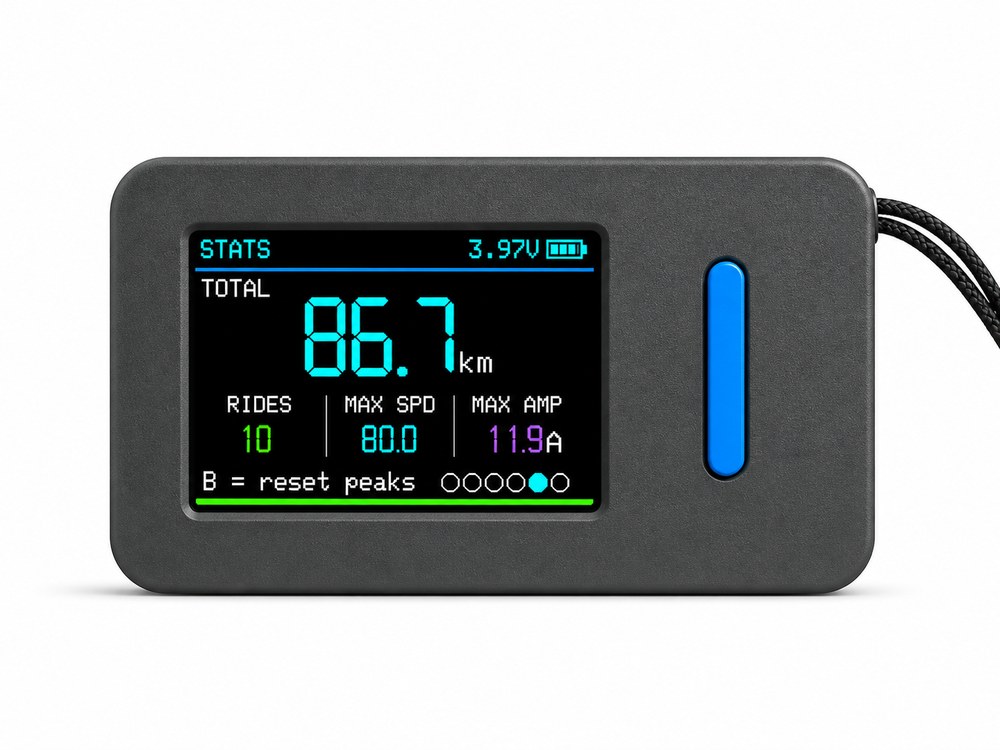
5 · Stats — per-wheel stats
- TOTAL — wheel odometer.
- Ride count, top speed and peak current.
- Press B to clear the peaks (confirm popup).
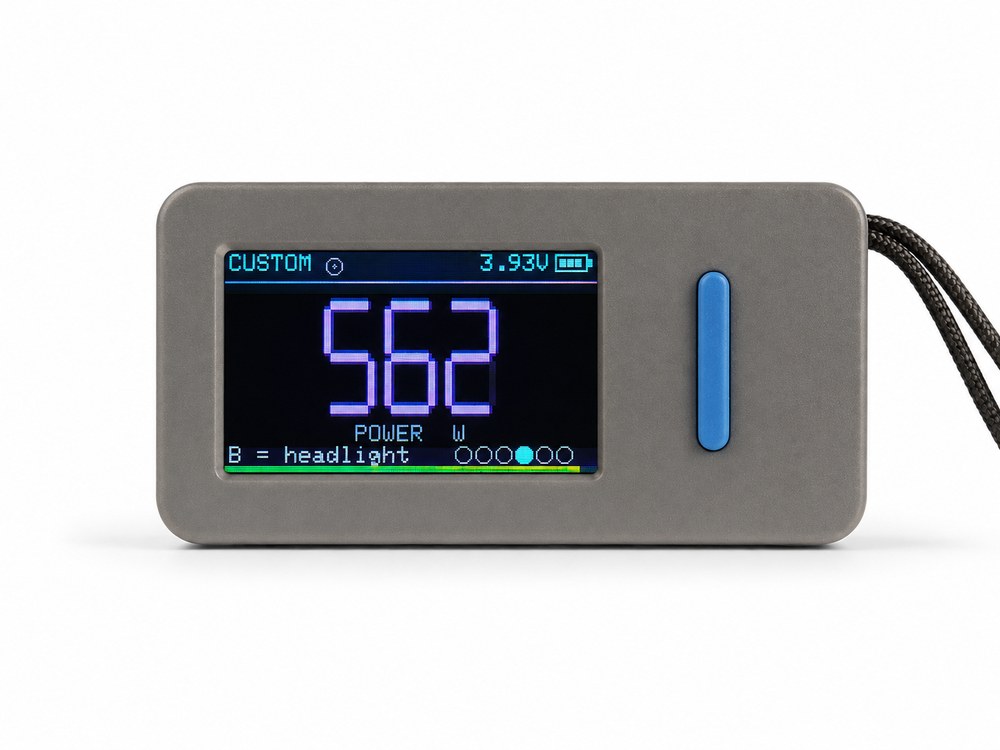
6 · Custom 1 — one value, your choice
- A single value, big and centred — you pick which.
- Speed, battery, voltage, current, power, temp, PWM, trip, ride, total, ride time or energy used.
- Set via Dashboard config in Dashboard setup or the WiFi panel; short B = your Press B action (headlight by default).
PWM — which wheels report it
Some wheels send their real motor duty over Bluetooth — there you see the exact figure, tagged plainly “PWM”. Wheels that don't report it now show no PWM at all by default: the value reads “--” with a “set calib” prompt. Give that wheel a one-time PWM calibration in My Wheels (Section 6) and EucBuddy then estimates the duty from speed and voltage, tagged “PWM est” — a useful guide, not a precise gauge.
| Wheel | PWM value |
|---|---|
| InMotion V2 (V11/V12/V13/V14) | Exact (from the wheel) |
| Veteran / Leaperkim / Nosfet | Exact (from the wheel) |
| Begode / Gotway | Exact on models that send it, otherwise needs calibration |
| KingSong · classic InMotion | Needs calibration (then shown as “PWM est”) |
Until a wheel that can't report PWM is calibrated, every PWM readout — on Custom 3, on Custom 1 — stays “--”, and the PWM alert won't fire for it.
Ride time & energy
Any Custom slot can show TIME — how long the current ride has been running, as mm:ss, rolling over to h:mm:ss once a ride passes the hour — or ENERGY — how many watt-hours this ride has taken out of the wheel's pack. Pick them like any other value under Dashboard setup → Dashboard config, or in the WiFi panel.
- Both count only while the wheel is connected. A disconnect, a drop-out or a full power-off simply pauses them — EucBuddy never guesses what happened while it wasn't listening.
- They survive sleep and reconnect: Power save keeps counting with the screen off, and Power off resumes where it left off on wake (the powered-off minutes aren't counted, because nothing was measured).
- Energy is what you consumed — regenerative braking doesn't count backwards, so the figure only ever goes up.
- Both are saved with the ride, so you can see them later in Rides (Section 12).
Button cheat-sheet
| Where | Button | Action |
|---|---|---|
| Reconnect screen (after wake) | B short | Ask to cancel the reconnect — a second B confirms and goes back to scanning |
| A short | Dismiss that question and carry on reconnecting | |
| Scan screen | A short | Next wheel in the list |
| B short | Connect to highlighted wheel | |
| B hold | Star / unstar the wheel (favorite) | |
| A hold | Open the main menu (carousel) | |
| Ride screens | A short | Next screen (default: Dashboard → Custom 3 → Power → Trip → Stats → Custom 1) |
| B short | On Dashboard/Custom 3/Power/Custom 1: your Press B action — headlight (default) or horn · on Trip/Stats: reset (confirm popup) | |
| B hold | Your Long press B action — Speed limiter (arm / restore the cap on Begode, KingSong, supported modern Leaperkim/Nosfet wheels and the InMotion P6 and V14; enable Limiter first), Horn or headlight; Section 6 | |
| Main menu (carousel) | A short | Next icon (Dashboard · MyBuddy · Weather · Charge control · Rides · My wheels · Blackbox · Alerting · Connections · Dashboard setup · Settings · Info · Disconnect when connected) |
| B short | Open the highlighted item | |
| A hold | Back to where you were | |
| My Wheels | A short | List: next wheel · detail: next row |
| B short | List: open the wheel · detail: open EUC health / its rides / adjust calibration (+) / clear | |
| B hold | Detail (Spin/Volt row): fast-adjust the calibration value | |
| A hold | Back (detail → list → carousel) | |
| EUC health | A short | Scroll the health rows |
| B short | Ask the connected wheel for a fresh reading | |
| A hold | Back to the wheel's detail screen | |
| Settings list | A short | Next item |
| B short | Select / change value | |
| A hold | Back | |
| Rides viewer | A short | Scroll the ride list · in details: next page |
| B short | Open / close a ride's details | |
| B hold | Delete (list: all rides · details: this ride) — confirm popup | |
| MyBuddy | B short | Feed one zap from the bowl, or pet if empty / fully grown |
| B hold | Open the MyBuddy / Zap Dash selector | |
| Buddy selector | A / B | A switches between MyBuddy and Zap Dash; B opens the selected item |
| Zap Dash | Tap A / B | A = duck (about 0.6 s) · B = jump |
| Hold A / B | End the run: A (~1.2 s) → main menu; B (~1 s) → Buddy selector | |
| Charge | ||
| Charge page | A short | Statistics screen, and back |
| B short | Switch the plug on or off | |
| B hold | Charge setup | |
| A hold | Back to the carousel | |
| Control charging view (USB, device was off) | A short | Normal start |
| B short | Switch the plug (no plug set: either key starts normally) | |
| Charging screen (Battery / Weather) | A / B | Normal start. While an alert is ringing, the first press only silences it. |
| Charge setup · Connections · Alerting · Blackbox · Dashboard setup | A / B | A = next row · B = change · hold A = back |
| Weather | A hold | Back to the menu (the page has no other controls — Section 8) |
| Any popup | B / A | B = yes/confirm · A = cancel |
| Power / wake | PWR | StickS3: turn on / wake / switch off. T-Display-S3: wake with A or B. See the board-specific instructions in Section 11. |
Menu — every option
Hold A from any screen to open the main menu — an animated carousel of icons. A moves between them, B opens the one in the middle, holding A takes you back. The item you're already on is hidden, so you only see where you can go. Names below are the on-device labels:
| Icon | Opens |
|---|---|
| Dashboard | Back to the live ride screens (or the scan list when no wheel is connected). |
| MyBuddy | The virtual pet. Hold B there to choose MyBuddy or Zap Dash. |
| Weather | The weather station — clock, temperature, sky and forecast (Section 8). Needs a stored home network. |
| Charge control | The charging wheel beside the smart plug feeding its charger, with an automatic switch-off at a level you choose. Hold B there for Charge setup (Section 10.2). The WiFi panel shortens this tab to Charge. |
| Rides | The Rides viewer — your stored ride history (Section 12). |
| My wheels | Your favorite wheels — per-wheel rides, lifetime totals and PWM calibration (see below). The WiFi panel writes this as My Wheels. |
| Blackbox | Battery-map logging — records a battery curve to the device (see below). |
| Alerting | Speed limiter + on-device warning beeps (see below). |
| Connections | Everything WiFi: turn it on, pick Access point or Home WiFi, and see the live link status (see below). |
| Dashboard setup | Ride-screen button actions, the two Custom dashboards, background tint, units and temperature unit. |
| Settings | General device, connection and power options. |
| Info | Device ID, firmware version, power-on counter, lifetime ride count and battery. The power-on counter survives a factory reset (a true lifetime total). |
| Disconnect | Drops the wheel and goes back to scanning. Only appears while a wheel is connected. Opened from a ride screen or the scan list, the carousel starts centred on it; from Weather, Charge, Settings and the rest it starts on the first remaining icon. |
Dashboard setup
Choose Dashboard setup from the carousel to configure how ride screens behave. Press A to move and B to change a value. The list shows a few rows at once and scrolls as you move through it.
| Option | What it does |
|---|---|
| Press B | Action for a short B press on Dashboard / Custom 3 / Power / Custom 1: Light (default) or Horn. |
| Long press B | Action for holding B on a ride screen: Speed limit (default), Horn or Light. |
| Dashboard config > | Opens a submenu that assigns a telemetry value to each Custom slot (see below). |
| Background | The shared backdrop tint for all six ride screens — Black, Pink, Blue, Green, Teal or Yellow. Live swatches sit in the row, so you can see what you're picking. Every tint is deliberately near-black and flat so the telemetry stays crisp — all six are shown below. |
| Units | km or miles — converts every speed and distance on screen. MyBuddy is exempt — Section 7. |
| Temp unit | °C or °F — switches every temperature reading on screen. |
The six backgrounds
Same dashboard, one setting — Background repaints only the backdrop. Telemetry, colours and layout never change. Blue is the default; B steps through them and the row's live swatches show what you're picking.
The tints are lifted a few percent here so the hues survive a bright phone screen — on the device they sit much closer to black, which is exactly what keeps the telemetry crisp. The coloured frame is just this guide's swatch border.
Dashboard config — the two Custom screens
Four rows, one per slot. B steps each one through the same list of values: speed, battery, voltage, current, power, temp, PWM, trip, ride, total (odometer), ride time (TIME, mm:ss and h:mm:ss past an hour) or ride energy (ENERGY, Wh) — the last two are explained in Section 4.
| Row | Fills | Default |
|---|---|---|
| Custom 1 | The single big value on the Custom 1 screen (6th by default). | Speed |
| Custom 3 main | The large left-hand value on Custom 3 (2nd by default). | PWM |
| Custom 3 upper | The small upper-right value on Custom 3. | Speed |
| Custom 3 lower | The small lower-right value on Custom 3. | Voltage |
Leaving the defaults alone gives you exactly the old fixed PWM screen. Whenever PWM sits in the Custom 3 main slot it keeps its safety colours and the set calib / PWM est tags described in Section 4. All four slots are also in the WiFi panel.
Settings
From the carousel pick Settings. Move with A, change with B. Names match the on-screen labels.
| Option | What it does |
|---|---|
| Brightness | Screen brightness — 3 levels. |
| Flip screen | Rotates the screen 180° — for mounting EucBuddy upside-down. The buttons keep working as labelled. |
| Intro anim | Plays the animated startup splash (on by default). Turn it off for a quicker turn-on — cold boot goes straight to the scan screen. |
| Sound | UI, MyBuddy and Zap Dash sounds on / off. StickS3 has a speaker. Standard T-Display-S3 builds have no speaker, so this row is hidden (safety alerts use a flashing backlight instead). |
| Auto-sleep | Inactivity timeout: 30 s / 1 min / 2 min / 5 min / Off. |
| Sleep type | What that timeout does while connected to a wheel: Power save (screen off, keeps logging the ride) or Power off (full shutdown, reconnects on wake). Disconnected, it always powers off. |
| Only EUC | Scan filter — show only recognised wheels (recommended: on). |
| Battery | What to show top-right for EucBuddy's battery: percent (%) or voltage (V). |
| Begode V | Begode pack voltage (67–168 V). Set it to match your wheel so the displayed voltage is correct. |
| Factory reset | Restores defaults and erases all stored rides. Opens a confirm popup (B = yes). |
| Power off | Turns the device off. |
My wheels — favorite wheels & PWM calibration
The carousel's My Wheels icon lists every wheel you've starred (Section 3). If you haven't starred any yet, it prompts you to hold B on a wheel in the scan list. A moves down the list, B opens the highlighted wheel. A small cyan dot means the wheel already sends real PWM; a green dot means you have set a PWM estimate calibration. Each wheel's detail screen shows:
| Row | What it does |
|---|---|
| Name | The heading shows the wheel's given (custom) name when you've set one (Section 3), otherwise its Bluetooth name; a BT line just below always shows the real Bluetooth name, so both are visible at once for a renamed wheel. |
| Vendor | The detected brand (display only), in the brand's accent colour. |
| EUC health | A one-word verdict — Good, Fault or Unknown — for what this wheel reports about itself. Press B to open the full health screen (below). |
| Rides | This wheel's lifetime ride count — a running total that survives deleting individual rides and is cleared only by a factory reset. Press B to open a rides list filtered to just this wheel. |
| Spin | PWM-calibration spin speed — the wheel's no-load “spin” (lift-up) speed, 20–150 km/h. B steps +0.5; hold B to fast-adjust (wraps at the top). On a wheel that already sends PWM this row reads PWM = Native. |
| Volt | PWM-calibration voltage — the pack voltage the spin speed was measured at, 10–180 V. Same B / hold-B editing. Native PWM: Calibration = Disabled. |
| Clear calib | Press B to remove this wheel's estimate calibration. Native PWM: the row reads Native PWM and does nothing. |
Why calibrate? Wheels that don't report their real motor duty (KingSong, classic InMotion, older Begode) show no PWM until you set the two values above — then EucBuddy estimates the duty from live speed and voltage using your wheel's calibration values (marked “PWM est” on the Custom 3 screen). Wheels that already send real PWM don't need this. Calibration is stored per wheel, kept across power-offs and updates, and can also be set from the WiFi panel's My Wheels page section (Section 9). Editing it while that wheel is connected updates the live estimate at once.
EUC health
Open the EUC health row of a wheel's detail screen to see the diagnostics that wheel broadcasts about itself. A scrolls the rows, B asks the connected wheel for a fresh reading, holding A goes back.
| Row | Shows |
|---|---|
| Overall | The summary verdict: Good, Fault or Unknown. |
| Controller | Controller status and its temperature. |
| Hall sensors | Hall-sensor status. |
| Battery · BMS 1 / 2 | Per-pack status, then separate rows for min / max cell voltage and temperature. Cells outside 2.50–4.25 V, a spread over 0.15 V, or a temperature outside −20…80 °C read as a fault. Anything the wheel never sends stays Not sent. |
The header says HEALTH LIVE when the wheel is connected right now and HEALTH LAST when you're looking at the last snapshot EucBuddy saw — dimmed, so you can tell at a glance. Missing fields read Not sent rather than pretending to be OK. How much you see depends entirely on how talkative your wheel is.
Blackbox — battery map
The carousel's Blackbox icon opens a small logger that records a battery curve to the device (about one row per second — handy for tuning). Inside:
| Option | What it does |
|---|---|
| Battery map | Logging on / off. |
| Source | Host (EucBuddy's own battery) or Wheel (the connected wheel). Switching clears the file. |
| Delete log | Erases the log (confirm popup). The header shows the file size and free space. |
Download the CSV from the WiFi panel (Section 9).
Alerting — speed limiter & warning beeps
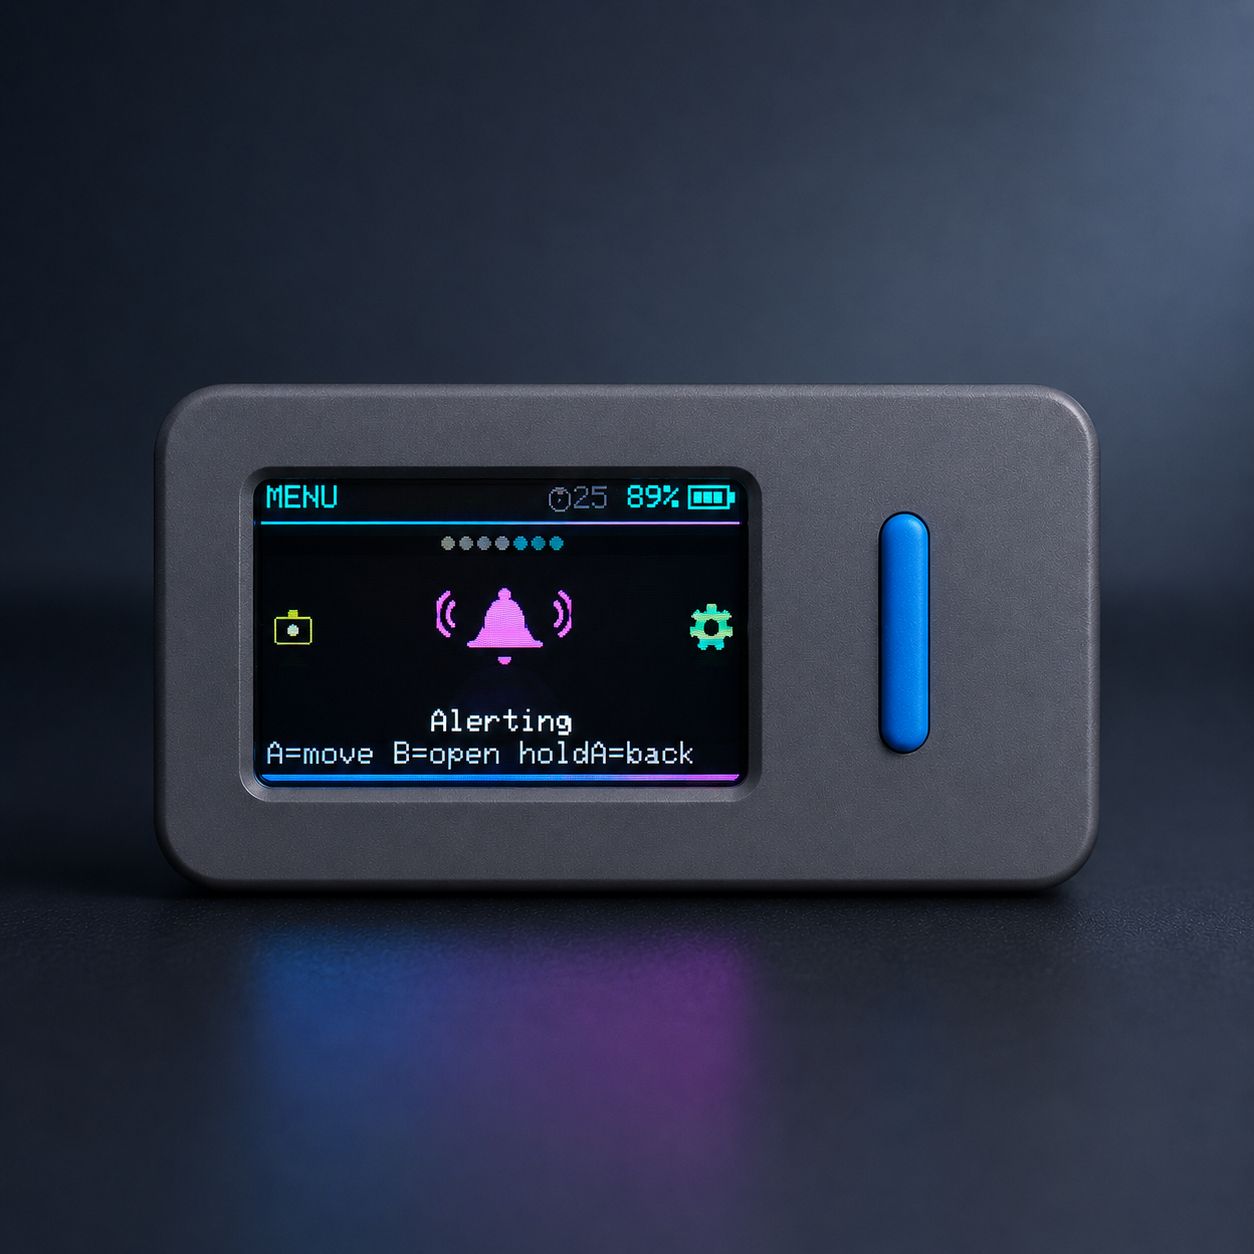
The carousel's Alerting icon groups the speed limiter and the on-device warning beeps. Move with A, change with B.
| Option | What it does |
|---|---|
| Limiter | Master on / off for the speed limiter — off by default. While off, holding B won't arm the cap and the top-bar glyph shows a cross. Turn it on to use the limiter. |
| Wheel alert | While the limiter is armed, also set the wheel's own speed warning to 1 km/h below the cap. Available for KingSong, supported modern Leaperkim/Nosfet wheels and the InMotion P6 and V14. Changed while armed, it waits for the same stop as arming and counts only once the wheel confirms it. This row is grey and cannot be changed while Limiter is off. |
| Speed limit | The hard-cap value the limiter writes to the wheel, in km/h (5 km/h steps). It only ever lowers the wheel's own maximum: set above it, the wheel keeps its own. |
| Speed alert | Beep when your speed reaches the threshold, plus Speed val — the threshold. |
| PWM alert | Beep when the motor load (PWM) reaches the threshold, plus PWM val — the threshold. |
| Batt alert | Beep when the wheel battery drops to the threshold, plus Batt val — the threshold. |
Speed limiter (hard cap)
First turn on Limiter — it's off by default. Then, on any ride screen (Dashboard, Custom 3, Power, Trip, Stats or Custom 1), hold B to request the cap (with Long press B set to Speed limit). EucBuddy waits for fresh telemetry showing at most 1 km/h continuously for one second before writing and verifying your Speed limit. A blinking green gauge means pending, not an active cap. A second confirmation beep means the cap was verified. If verification still fails after one retry while stopped, EucBuddy cancels the request and restores the original settings. Hold again after it is armed to restore the wheel's original max. EucBuddy saves the wheel's current limit before changing it, so disabling the limiter restores the rider's original setting.
If Wheel alert is on, arming also moves the supported wheel's own warning threshold to cap minus 1 km/h. KingSong's three alarm thresholds are moved together; Leaperkim/Nosfet use their separate speed-alarm setting; the InMotion P6 moves both of its warning levels and the V14 its single warning. EucBuddy saves every affected value first and restores each one exactly when the limiter is released. Changing the option or cap while armed keeps the original snapshot safe.
InMotion P6 and V14: the cap is written the way InMotion's own app writes it. A cap below the wheel's speed warning moves the warning to cap minus 1 km/h even with Wheel alert off, as the app does; it is restored exactly with the cap, also when the wheel's values were set in mph. On the P6, EucBuddy first opens the wheel's settings session, as the app does, so arming can take a few seconds longer. Support for these two wheels is new and still being tested on real wheels.
KingSong: arming temporarily selects the wheel's beep warning mode, even with Wheel alert off. The original voice mode is saved and restored with the limiter, without changing the light mode. Arming is blocked if that original mode cannot be read.
The horn is a momentary wheel command, not a saved wheel setting. It is supported on Begode/Gotway, KingSong, Veteran/Leaperkim, Nosfet and InMotion; on an unsupported wheel the action simply does nothing. EucBuddy plays a short local confirmation cue as well.
The top-bar limiter glyph
A small glyph and number sit on the top bar, just left of EucBuddy's own battery. The number is the wheel's current max-speed limit in km/h (a dash while it's being read, ∞ if the wheel has no limit set); the glyph shows the state. When you arm the cap, the number becomes your Speed limit value:
Connections — WiFi & link info
The carousel's Connections icon gathers everything WiFi in one place. A moves between rows, B changes the highlighted one, holding A goes back. WiFi is off by default. Always starts the config connection at boot; Weather can also use the stored home network.
| Option | What it does |
|---|---|
| WiFi | Off / Session (until power-off) / Always (every boot). This is the WiFi on/off switch. |
| Type | Access point (default) — EucBuddy makes its own hotspot and you join it from your phone (Section 9). Home WiFi — EucBuddy joins your network instead, and the same panel is reachable from any device on it. |
| Info > | A read-only screen: the current Type, the Status, which Network you're on and the Address to type into a browser. It refreshes while connecting, so you can watch it come up. |
Using Home WiFi
Save your network's name and password in the WiFi panel (Connections page, Home WiFi card) — no update needed — or use Configure WiFi in the web flasher. For the config panel on your home network, choose Type = Home WiFi, then WiFi = Session or Always. Then open http://eucbuddy.local from any device on that network. If that name doesn't load, use the numeric address shown in Connections → Info.
- Only 2.4 GHz networks work — the chip has no 5 GHz radio.
- A popup reports the result: WiFi connected with the address, or WiFi failed with the reason. A failed join is deliberate about giving up — the radio goes back off and WiFi returns to Off and Type to Access point. Check the credentials before trying again.
- If you pick Home WiFi without having set a network, EucBuddy says No home WiFi — Set it in flasher and stays on Access point.
- A Factory reset erases the stored network along with everything else.
Weather on the charger
To show weather while USB is charging a switched-off EucBuddy, set Charge screen to Weather in Charge setup (Section 10.2). Section 8 covers that screen in full — both ways in, the glyphs, colours, forecast strip and city.
MyBuddy — your virtual pet
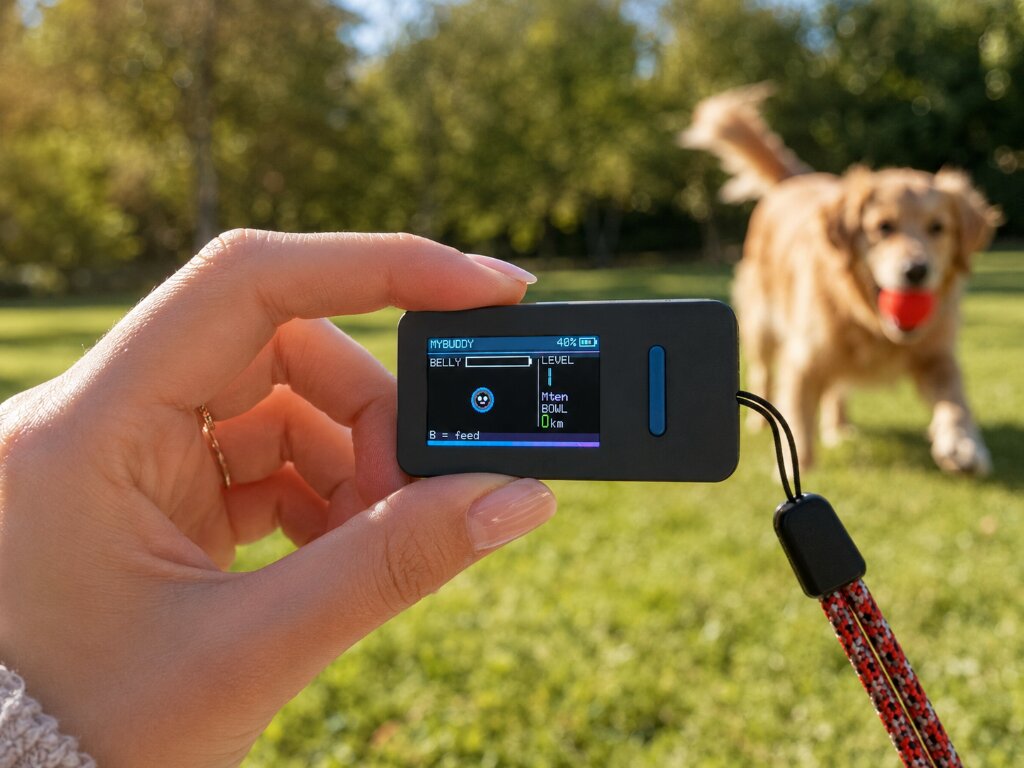
MyBuddy is a little pet living inside your EucBuddy. Open it from the menu (MyBuddy).
- Tap B to feed one zap from the bowl. If the bowl is empty or your buddy is fully grown, you can still pet it for free.
- Each full kilometre ridden earns one zap, regardless of km / miles display units. Zap Dash is another way to fill the bowl. Feeding, not just earning, advances your buddy's growth.
- Hold B to open the MyBuddy / Zap Dash selector. Tap A to switch, B to enter; hold A to return to the main menu.
- Your buddy looks around, yawns, stretches, spins, winks and hops. Feeding triggers chewing; these reactions don't cost extra zaps or create a hunger penalty.
- Infrared greetings require two IR-equipped devices (StickS3), both showing MyBuddy. Standard T-Display-S3 has no IR. Greetings stop while the selector or game is open.
- Give it a name in the WiFi panel (Section 9) — it shows top-left on the pet screen.
- Hold A for the menu, then Dashboard to ride.
Growth stages: Mten → Aero → Lynx → Sherman → Griffin. Their feeding targets are 30 / 60 / 120 / 240 / 480 zaps per stage (930 total to fill the last one). Your buddy gains accessories as it grows; the same character appears in Zap Dash.
Zap Dash
Wheel charging? Winter keeping you inside? Take your Buddy for a tiny ride. It rolls forward automatically: jump ground obstacles and duck under overhead hazards. A collision ends the run. No wheel connection or WiFi is needed.
Start a run
- Open MyBuddy from the main menu.
- Hold B to open the two-item selector, then tap A to highlight Zap Dash.
- Tap B to start, then release both buttons. The screen shows READY for about 0.9 s after you release both buttons.
Two buttons, two moves
| Input | In a run |
|---|---|
| Tap A | Duck for about 0.6 s (a little longer as MyBuddy grows). You stand up automatically. Tap again for another duck. |
| Tap B | Jump. You must land before jumping again. Jumping cancels a duck. |
| Hold A ~1.2 s | End the run and return to the main menu after the result. |
| Hold B ~1 s | End the run and return to the MyBuddy / Zap Dash selector after the result. |
These controls are the same on both boards and do not use your ride-screen B assignments. On the pictured LilyGO, A is the upper orange button and B the lower one; see button locations.
What lies ahead
The first level needs 10 cleared obstacles, and each level after it two more (12, 14, …). Completing a level earns one zap. The pace picks up as you progress through five environments — we'll leave the later ones for you to discover. An obstacle counts only after it has fully left the screen.
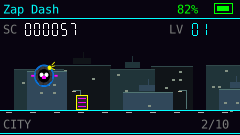
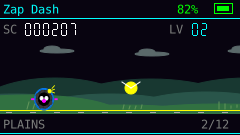
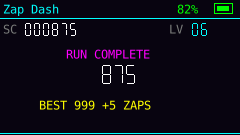
Illustrative frames rendered from the game's scenery, character and HUD code, not device photos. Example values; fonts and status-bar styling are approximated. Your Buddy's accessories depend on its growth stage.
Score, levels and zaps
- SC is your score, increasing with distance travelled in the game. LV is the current level; the counter in the bottom-right corner (for example 3/10) shows obstacles cleared in this level out of the number needed to finish it.
- A completed level puts one zap straight into MyBuddy's bowl and saves it. A collision doesn't take earned zaps away, but an unfinished level gives no partial reward.
- Back on MyBuddy, tap B to feed the earned zaps one at a time. Game score is not ridden kilometres and does not add to your trip or ride history.
- BEST is the saved high score; +N ZAPS is this run's reward, not the bowl total. The result stays up for about 1.6 seconds, then returns to the selector after a collision.
What to avoid
- Don't hold A to stay crouched: a duck ends by itself after about 0.6 s and a long hold exits. Holding B also exits — it doesn't keep you jumping.
- Don't duck too early or jump into an overhead hazard. Use short, timed taps; another jump won't work while airborne.
- Don't cut power to leave a run. Use the hold-to-exit controls or normal power-off so an improved best can be saved. RECORD NOT SAVED means the best-score write failed.
- A Factory reset clears your Buddy progress and Zap Dash best as well as other saved data.
Sound: on StickS3, Settings → Sound enables short cues for the start, jump, duck, cleared obstacle, earned zap and collision. Standard T-Display-S3 has no speaker; silence is expected.
Zap Dash requires firmware 0.5.00 or later; tap-to-duck: 0.5.01; all five environments: 0.5.02; game sounds: 0.5.03; 10+ obstacle levels: 0.5.05; level counter showing the real target: 0.5.07. Check your version in Info and use an available build for your selected board.
Weather
EucBuddy can also be a little weather station: a big clock, the temperature right now, the sky outside and what the next few hours look like. It shows up in two places — as its own screen from the menu, and instead of the battery animation while the device sits on a charger. Both need a home WiFi network stored on the device; the forecast is the only thing EucBuddy fetches from the internet.
Two ways in
| Where | How |
|---|---|
| From the menu | Hold A for the carousel and pick the yellow Weather icon — it sits directly after MyBuddy. Hold A again to go back. |
| On the charger | Set Charge screen to Weather in Charge setup (Section 10.2). Plugging USB-C into a switched-off EucBuddy then opens this instead of the battery gauge (Section 10). |
- No network stored? Both routes say Weather needs WiFi — Set it in flasher and nothing else happens. Store one in the web flasher or the WiFi panel first (Section 9).
- WiFi switched off? Opening Weather from the menu asks first — B turns the radio on just for this page and puts your WiFi setting back to Off when you leave. On the charger it needs no permission: the device is on external power by definition, which is the one case where EucBuddy brings up WiFi by itself.
- While the page is open it owns the radio, so an active config panel pauses and comes back when you leave. WiFi and Bluetooth share one antenna (Section 9).
What's on the screen
| Element | What it tells you |
|---|---|
| Condition glyph | The sky right now, drawn from the forecast's condition code — and animated (see below). |
| Temperature | The current temperature, coloured by how cold or warm it is. Follows your Temp unit setting, so it reads °F if that's what you picked. |
| Clock | The biggest thing on the screen — a device parked on a charger gets read from across the room. It's set over the internet and follows your chosen city's own time, daylight saving included. Dim --:-- means the time hasn't arrived yet. |
| Condition text · city | The condition in words on the left, the city you picked on the right. A long city name is trimmed with a dot rather than painted over the condition. |
| Forecast strip | Below the divider: one forecast hour at a time, sliding to the next (see below). |
The sky glyphs
The forecast's condition codes collapse into eight conditions — a finer set stops reading clearly on a small screen. Clear and partly-cloudy skies each get a second face: a sun by day, a crescent moon with stars by night, chosen from the daylight flag for your city rather than guessed from the hour. Anything the forecast doesn't name at all stays a plain ?.
Temperature colours
Cold blues through a temperate green into warm ambers, so a glance at the hue tells you the weather before you read the number. The forecast row uses the same scale.
The steps are always these Celsius values — switching to °F changes the number you read, not where the colour turns.
The forecast strip
Four horizons come from the same request — +1 h, +2 h, +4 h and +8 h. The strip shows one at a time, holds it about five seconds and slides the next one in. The quiet time on the right is the hour it actually lands on.
The strip above cycles exactly as the device does.
Your city
| Where to set it | How |
|---|---|
| Web flasher | Inside Configure WiFi there's a City box with live search — start typing and pick your town. Set once while you're flashing anyway (Section 13). |
| WiFi panel | The Weather page has the same search, so you can change city later without re-flashing (Section 9). |
- The built-in default is Warsaw, and a Factory reset puts it back.
- The clock follows the city: the time offset comes down with the forecast (already adjusted for daylight saving) and is remembered, so the clock is right from the next start. Right after a change the time is hidden until the new one lands.
- Opened over EucBuddy's own hotspot, the panel has no route to the internet to search with — it saves the plain name and the device looks up the coordinates on its next fetch. Nothing to do differently; it just resolves a moment later.
While it works — and when it can't
Until there is something real to show, the screen shows no readings at all rather than a half-filled dashboard: an animated mark, what it's doing, and why if it failed. It keeps trying — a refresh every 15 minutes, a retry about a minute after a failure — and never quietly swaps itself for the battery view.
Once it has readings, a later failure is not worth a whole screen — the numbers are simply a little old. The forecast stays put and a small orange ! appears under the top bar until the next refresh lands.
- Forecast comes from Open-Meteo, a free service that needs no account; the clock is set from public internet time servers.
- On the charger, a rising two-note chime plays when the first forecast lands, once per start — later refreshes stay silent, and it follows the Sound setting.
- Only 2.4 GHz networks work, as everywhere else on the device (Section 6).
WiFi config panel
EucBuddy can host its own WiFi hotspot with a config panel in your phone's browser — every setting with a bigger screen and a keyboard. WiFi is off by default.
| Step | Do this |
|---|---|
| 1 | Open Connections on the carousel and set WiFi to Session or Always. A WiFi icon appears on the top bar — it turns green once a phone is connected. |
| 2 | On your phone join the EucBuddy-XXXX network (open, no password). |
| 3 | The panel opens automatically (like hotel WiFi). If not, browse to 192.168.4.1. |
The panel is laid out like the device menu. Along the top is one page for each carousel item. Below it, a status bar shows EucBuddy's battery, the connected wheel and its battery, the network, and a pulsing dot while the page is in touch with the device. On a phone or tablet the pages fold into a ☰ menu, and a short status sits next to it. Home has one tile per page with a live summary. Switches and choices save the moment you change them, and a short message confirms each one. Text fields have their own Save button. Changes made on the device show up in the page too.
| Page | What's there |
|---|---|
| MyBuddy | Your pet's name, shown top-left on the MyBuddy screen. |
| Weather | Location: your city. Start typing and pick it from the live search. Forecast strip: which steps the strip cycles through, +1 h, +2 h, +4 h, +8 h. All four are on by default; none hides the strip. See Section 8. (Over EucBuddy's own hotspot the page has no internet to search with, so it saves the plain name and the device looks the city up itself.) |
| Rides | Your full ride history: tap a ride to see or edit it, + Add ride, ↓ CSV for everything, and Delete all rides. See Section 12. |
| My Wheels | One card per favorite: a custom name (shown in place of its Bluetooth name), its PWM calibration (spin km/h + pack V, the same values as on the device, Section 6; wheels that report real PWM just say Native), Save and Remove. See Section 3. |
| Blackbox | The battery map: logging on/off, the file's size, Download CSV and Delete file. |
| Alerting | Speed limiter: the hard cap switch, the cap, and the optional in-wheel warning, greyed out until the cap is switched on. Changing it while the cap is armed uses the same safe save-and-restore as the device (Section 6). Buddy alerts: speed, PWM and low-battery beeps, each with its threshold. |
| Charge | Now: the wheel and the smart plug side by side, with Switch on / Switch off. Smart plug: its address, Find on network, Measure by (battery level, voltage or timer) and the switch-off level, voltage or time. Charging screen: the Battery / Weather / Control view, Watch a wheel and Alert at. See Sections 10.1–10.3. |
| Connections | Home WiFi: the network EucBuddy joins in Home WiFi mode, and the one the weather and the smart plug need. |
| Dashboard | Ride screens: drag them into order and switch off the ones you don't use. The default order is Dashboard → Custom 3 → Power → Trip → Stats → Custom 1 (the portal labels the first row Speed), and at least one stays on. Buttons: what a short tap and a hold of B do. Custom values: Custom 1 and the three Custom 3 slots. Look & units: background, km / miles, °C / °F. |
| Settings | Display: brightness, flip screen, boot intro, battery as % or volts. Power & sound: sound, auto-sleep, what idling on a wheel does (power off / power save), and a Power off Buddy button. Wheels: Only-EUC scan list and the Begode pack voltage. |
| Info | Read-only: device ID, firmware, board, battery and voltage, plus how the page is connected, the home network, EucBuddy's IP address and the connected wheel. |
In the Home WiFi card, type the network name and password and press Save WiFi, so you can set or replace it without re-flashing. The password is written to the device but never read back to the page; only the network name comes out again. Only 2.4 GHz networks work. Forget (with a confirmation) erases it and puts back what depended on it: the link Type returns to Access point, and Charge screen returns to Battery only if it was Weather (a Control view is left as Control). The link you are reading the panel over is deliberately left alone; the change applies at the next start.
On the Rides page every entry lists its ride time and the watt-hours used, and both can be edited by hand. Type the time as mm:ss (for example 12:34), as h:mm:ss for a long ride, or as plain seconds. Leave a field empty to say that value was never measured; it then shows as a dash instead of a misleading zero. Bad input is refused with a message rather than silently saved.
Downloads
Both CSV exports — Rides and the battery map (Blackbox page) — are run from the panel:
- The battery-map button fetches the file in small verified pieces and shows “Downloading … %” as it goes, retrying a piece by itself if the WiFi hiccups, so even a large log comes through intact.
- Using the panel counts as activity, and a download in progress holds the device awake for the whole transfer — auto-sleep can't shut the hotspot down mid-file.
- If something does go wrong (busy device, empty log), you get a clear message instead of an empty or truncated file.
Charging
Plugging USB-C into a powered-off device opens a dedicated charging screen: dimmed so it can sit on a desk. Choose Battery, Weather or Control in Charge setup → Charge screen (Section 10.2).
| Device | Battery reading on USB |
|---|---|
| M5Stick-S3 | Shows an estimated percentage and cell voltage. |
| T-Display-S3 | Cell voltage cannot be read reliably while USB is connected, so the percentage / voltage is unavailable, not zero or full. The same applies in the WiFi panel. |
| Situation | Behaviour |
|---|---|
| Press A or B | On the Battery or Weather view, either key continues to a normal boot. On the Control view with a plug address stored, A boots and B switches the plug (Section 10.2). |
| Unplug the cable | StickS3 powers off. T-Display-S3 waits for its cell reading to settle (at least 1.4 s of steady samples after a short unplug debounce), shows the valid result for about 2 s, then powers off. A or B continues normal use; reconnecting USB cancels the shutdown. |
| While charging | Auto-sleep is disabled — it won't switch off on its own. |
Wheel charging monitor
Charge your wheel and EucBuddy side by side, and let EucBuddy keep an eye on the wheel. While it sits on its own charging screen it finds one of your favorite wheels, reads its battery over Bluetooth and shows the level along the bottom of the screen. When the wheel reaches the level you picked, for example 90 % for everyday riding or 100 % before a long trip, the screen flashes and EucBuddy beeps. You don't need to keep checking the wheel or have the phone app open.
Before you start
- The wheel must be a favorite (Section 3): on the scan list, hold B on it to star it. Only starred wheels can be watched.
- The monitor runs on the charging screen (plug USB-C into a switched-off EucBuddy) and on the carousel's Charge control page in normal use.
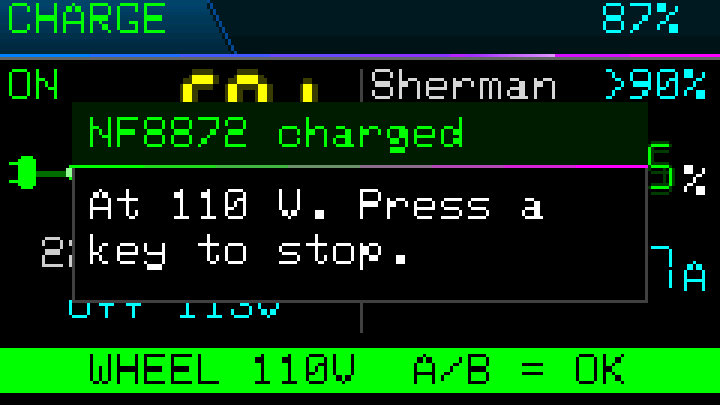
- On the Charge page the same alert is a popup (“Press a key to stop”), a WHEEL … A/B = OK banner, the rising triple and a flashing backlight every 10 s until a key press — on any screen, and that press does nothing else. On a T-Display the flashing is the alarm. A level the wheel already holds when you open the page does not alert.
- The wheel must be switched on while it charges. Most wheels turn their Bluetooth off when they are powered down.
- Keep EucBuddy within Bluetooth range, ideally in the same room as the wheel.
- Close the phone app or disconnect it from the wheel. Most wheels accept only one Bluetooth connection at a time, and whoever connects first keeps it.
Set it up (once)
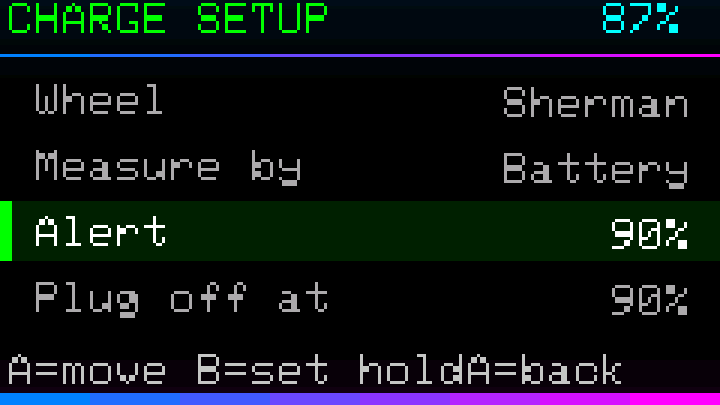
- Open the carousel's Charge icon and hold B for Charge setup. Move to Wheel with A and press B until your wheel's name shows. Each press steps Off → your favorites, in list order → Off.
- Move to Alert and press B to pick a level: Off → 50 → 60 → 70 → 80 → 85 → 90 → 95 → 100 % → Off. The default is 100 %. With Measure by (the row above) on Voltage, the alert is a pack voltage instead: B adds 1 V, hold B to step fast (Section 10.2).
- Hold A to leave. Both choices are remembered across power-offs.
Prefer the phone? In the WiFi panel (Section 9) open Charge and use the Charging screen card. Watch a wheel lists your favorites, and Alert at lets you tick several levels from 50 % to 100 % (50, 60, 70, 80, 85, 90, 95, 100). Several levels show on the device as “N levels”. Pressing B on that row afterwards starts again from Off.
Every time you charge
- Plug the wheel into its charger and switch the wheel on.
- Switch EucBuddy off and plug it into USB-C. The charging screen opens in the Battery, Weather or Control view you chose in Charge screen.
- The bottom line shows searching…, then connecting…. Within about half a minute you should see the wheel's name and battery.
- Leave both alone. When the wheel reaches your level, EucBuddy alerts you (see below).
- Done: press A or B to start EucBuddy normally, or unplug it to switch it off. Either way the monitor lets go of the wheel.
Reading the bottom line
| You see | What it means |
|---|---|
| searching… | Looking for the wheel. It searches in short bursts with pauses in between, so the Weather view keeps its WiFi time. If it stays here, see the tips below. |
| connecting… | The wheel was found and Bluetooth is connecting. |
| reading… | Connected. The first few seconds of data are skipped on purpose, until the wheel reports a settled level. |
| Name · battery · 64% | The wheel's live level. Its name is the custom name you gave the favorite, otherwise its Bluetooth name. A long name scrolls back and forth. The colour follows the level: green above 30 %, yellow from 16 to 30 %, red at 15 % and below. |
| >90% on the right | The next level that will alert. |
| done on the right | No alert left to wait for: every level you chose has been reached, or Alert (Charge setup) is Off. |
| Grey level + offline | The connection dropped. The last reading stays on screen in grey so you still know roughly where the wheel was, and EucBuddy keeps looking for it. conn in place of offline means it is reconnecting right now. |
| BLE busy | A connect attempt has not finished for 45 seconds, usually a very weak signal: move EucBuddy closer to the wheel. It clears by itself when Bluetooth answers. Charging is not affected. Press A or B: EucBuddy restarts straight into a normal start. Or unplug it to switch off. |
When the wheel reaches your level
- The bottom line becomes a green WHEEL 90% A/B = OK banner and the backlight flashes. On M5Stick-S3 a rising triple beep also sounds. A standard T-Display-S3 has no speaker, so it only flashes.
- The beep plays even with Sound off. You asked for this alert by choosing a wheel and a level.
- It repeats every 10 seconds until you press a key, however long that takes.
- The first press of A or B only stops the alert. The next press starts EucBuddy normally, as usual.
How alerts are decided
- Each level alerts once per charge. A wheel that drops back to 89 % and climbs to 90 % again does not alert a second time.
- Levels the wheel has already passed are skipped. Plug in a wheel at 92 % with alerts at 80 and 90 %, and you get no alert at all. Only the levels still ahead count.
- A level must hold for 3 seconds before it alerts, so a reading that flickers across the line alerts only once.
- Missed while the link was down? If the wheel passed one or more levels while the connection was lost, you get one alert on reconnecting, for the highest of them.
If it doesn't find the wheel
- Stays on “searching…”: is the wheel switched on? Is the phone app still connected to it? Move EucBuddy closer.
- The bottom line just says “A / B = power on”: no wheel is selected. Check Wheel in Charge setup. Removing a wheel from your favorites also sets it back to Off.
- Wheel says “No favorites”: star the wheel first (Section 3).
- It never alerts: check Alert in Charge setup isn't Off, and remember that levels the wheel had already passed when monitoring started are skipped.
Charge control & smart plug
Charge control shows your wheel and the smart plug feeding its charger on one screen, and can switch the plug off when the wheel reaches a level you choose. Stopping at 80 or 90 % is kinder to the pack than sitting at 100 %, and you don't have to be there to unplug it. EucBuddy talks to the plug directly over your home WiFi: no cloud, no account, no phone app.
Two ways to see it
| Where | When |
|---|---|
| The Charge page | Any time: open the carousel's Charge icon. Shows the connected wheel, or connects your watched wheel (see The wheel on the page). |
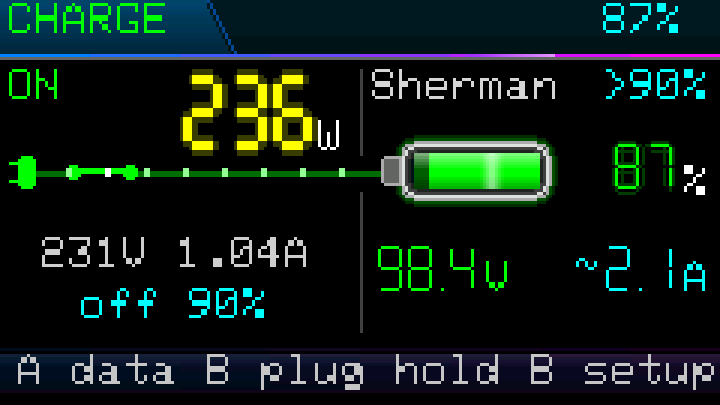
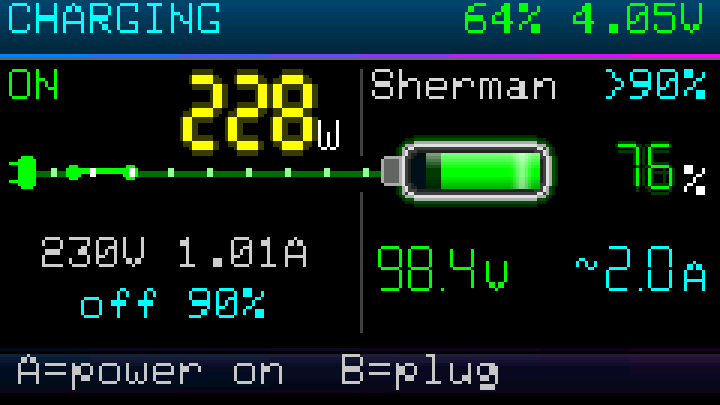
| Control charging view | Set Charge setup → Charge screen to Control. Plugging USB-C into a switched-off EucBuddy then opens this page instead of the battery animation, with the charging bar on top. It finds the watched wheel by itself and joins home WiFi by itself. B switches the plug on or off (a short high beep; a low beep when the plug isn't answering); A carries on to a normal start. Without a plug set, either key starts normally. |
Set it up (once)
- Store your home network on EucBuddy (WiFi panel → Connections → Home WiFi, or the web flasher) and put the plug on the same network. Reserve the plug's address in your router, so it never changes.
- Open the Charge page and hold B for Charge setup. Move to Plug (it reads Find >) and press B. Confirm Find plug on network? with B (it asks Enable WiFi and find plug on network? when WiFi is off).
- A popup shows the search: Joining home WiFi…, then Searching the network N%. It stops at the first plug and ends with Plug found and its address, which is saved (+N more when it saw others too), or No plug found. On a quiet network a full search takes up to about 3 minutes. You can dismiss the popup: the search carries on and reports the result.
- Other endings: WiFi join failed (check the home network), Plug search stopped (the WiFi link changed during the search, for example the WiFi panel was switched on; search again), Home WiFi starting (the panel is still joining; try again in a moment) and Already searching. If the panel's Find on network is already running, EucBuddy follows that search instead and nothing is saved: you choose the plug in the panel (see below).
- No plug found? Type its address in the WiFi panel: Charge page → Smart plug card → Address → Save address. The router's device list or the plug's own page shows it.
- Choose what the alert and the switch-off go by with Measure by (below Wheel): Battery (the wheel's level), Voltage (its pack voltage; then Alert and Plug off at are both in volts) or Timer (the switch-off only; the alert stays in %). Then set Plug off at Off → 50 → 60 → 70 → 80 → 85 → 90 → 95 → 100 %, with Voltage whole volts (see below), or with Timer Plug off after Off → 30 min → 1 → 1.5 → 2 → 3 → 4 → 5 → 6 → 8 h. Arming either also sets the charging screen to Control, because the switch-off works there.
- Optional: pick the watched Wheel and its Alert level (Section 10.1).
Opening the page: WiFi
The plug is reached over your home network, so the page may need WiFi. It asks only when it would change something:
| Situation | What happens |
|---|---|
| WiFi Off, Type Home WiFi | Asks Enable WiFi?. Yes switches WiFi on for this visit only; leaving the page puts it back to Off. |
| WiFi Off, Type Access point | Asks Join home WiFi?. |
| EucBuddy's own access point is on | Asks Pause portal, join home WiFi?: the hotspot has no route to your plug. It comes back when you leave the page. |
| Already on home WiFi | Asks nothing; the plug uses that connection, and the WiFi panel stays reachable at http://eucbuddy.local. |
| No plug, or no home WiFi stored | Opens without touching WiFi and shows the wheel. |
Said no, or switched WiFi off later? The plug side shows no WiFi and B asks again. While the page is open it reconnects to the plug by itself if the link drops.
Reading the screen
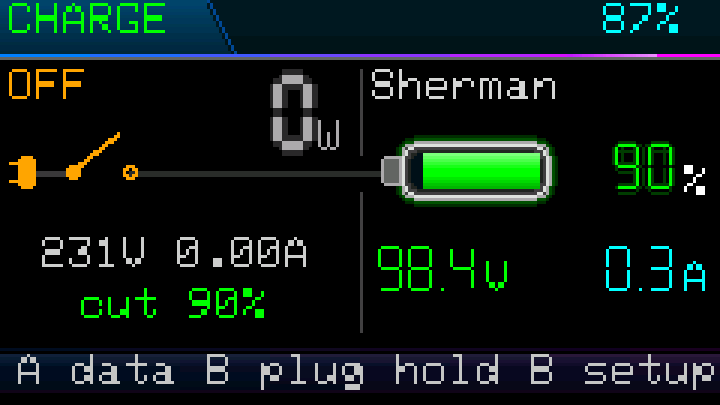
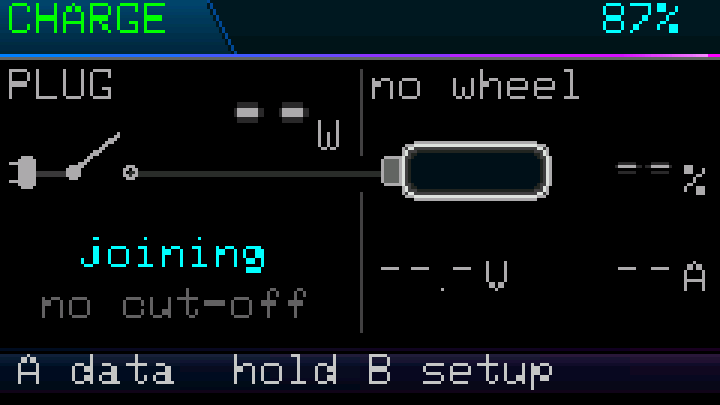
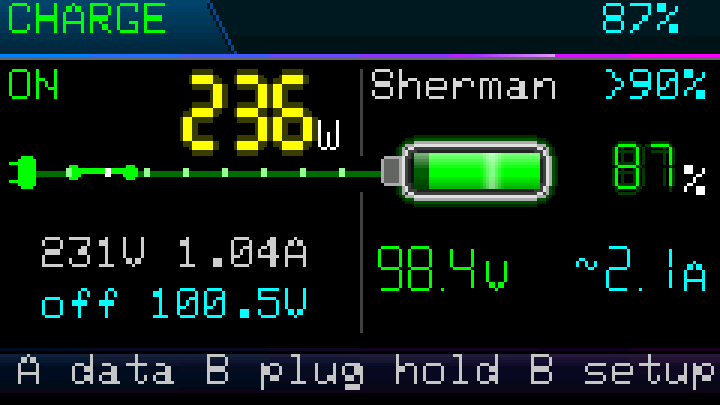
| You see | What it means |
|---|---|
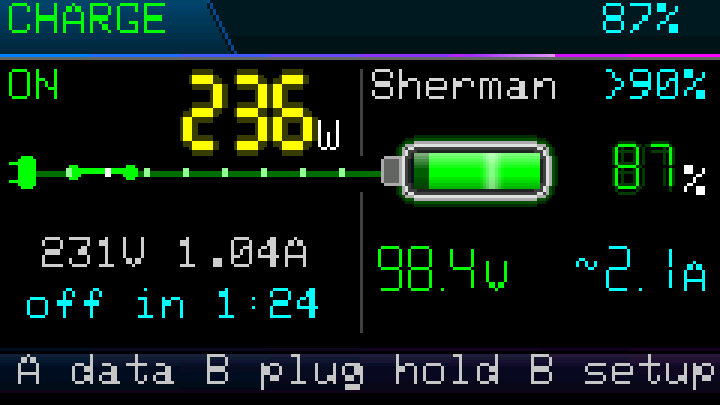
| ON / OFF | The plug's relay. The switch drawing closes or swings open with it. PLUG in grey: no reading yet. |
| Watts | What the charger draws now: yellow while it draws, grey when it doesn't (charger finished, or relay off). A plug without a meter shows relay on / relay off. |
| Moving dots on the wire | Current is flowing into the wheel. A lit wire without dots: the relay is on but nothing is drawing. A dark wire: the switch is open. |
| 231V 1.04A | Mains voltage and the plug's current. |
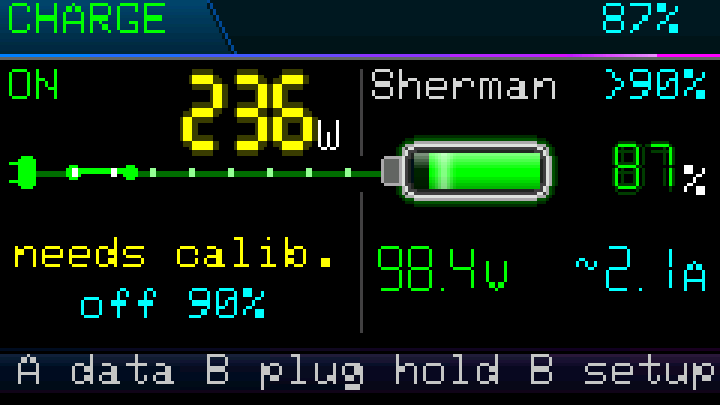
| needs calib. | The plug's readings can't all be right. See Section 10.3. |
| joining / no answer / no WiFi / no plug | Joining your network / the plug isn't answering (switched off at the wall? address changed?) / WiFi isn't on (B asks) / no address stored yet. |
| off 90% · cut 90% · cut fail · no cut-off | The switch-off level is armed / the plug was switched off there / it was asked to and never confirmed / no level set. |
| cut skipped | The plug was due to switch off, but you switched it yourself first (B or the portal), so EucBuddy left it as you set it. |
| other wheel | The wheel on screen isn't the one picked in Charge setup → Wheel, so its level won't switch this plug off. |
| timer 2:00 · off in 1:24 · timer done | Timer mode: armed and waiting for the plug to come on / counting down / the timer switched the plug off. |
| ~2.1A | Charge current worked out from the plug (see below). Without ~ it is the wheel's own reading. |
| Grey wheel values | The last reading, kept while the wheel's link is down. |
Buttons
| Button | On the Charge page |
|---|---|
| B | Switch the plug on or off. With no plug link yet it offers WiFi again; with no plug stored it says how to find one. |
| A | The statistics screen, and back. |
| Hold B | Charge setup. |
| Hold A | Back to the carousel. |
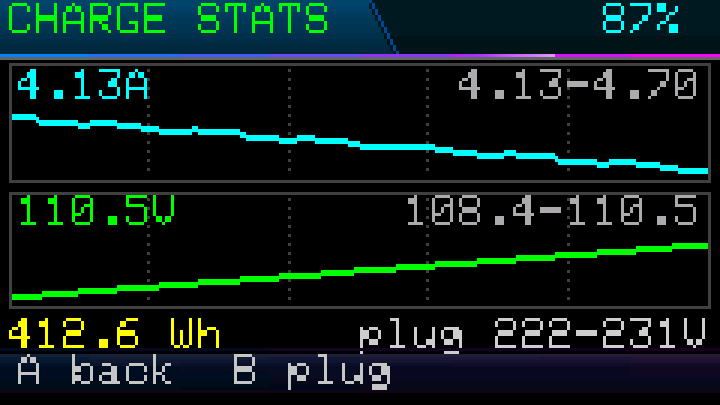
Statistics (A)
Press A on the Charge page for its second screen, and again to go back. B still switches the plug, and hold B still opens Charge setup.
- Two graphs of the last 10 minutes, one point every 5 seconds, newest on the right, a faint line every 2 minutes: the charge current (the same one the page shows, “~” values from the plug included) and the wheel's pack voltage. Each shows the latest value on the left and the window's low–high on the right. A stretch without readings is a gap.
- Energy delivered this session, in Wh, from the plug's meter. A plug without one falls back to the wheel's own volts × amps, shown with “~”.
- plug: the lowest and highest mains voltage the plug measured this session.
- A session starts when you open the Charge page from the carousel. The statistics keep counting while you look at either screen or Charge setup, and in the background while the plug session runs.
The wheel on the page
- A wheel is connected: the page shows that wheel, whichever it is.
- No wheel connected: the page looks for the wheel picked in Charge setup → Wheel and connects it as soon as it is in range, staying on the page. The wheel side shows searching…, then connecting…; the plug keeps being watched meanwhile. A failed connect is tried again after a few seconds. BLE busy means a connect attempt has not finished for 45 seconds, usually because the signal is very weak (EucBuddy too far from the wheel, or behind metal): it clears by itself when Bluetooth answers, and the search carries on; if it stays, restart EucBuddy. Leaving the page, or opening Charge setup, stops the search.
- Like on the charging screen: the wheel must be switched on, and the phone app disconnected.
Charge current and the “~”
Most wheels measure current on the controller, not on the charge port: the charger feeds the battery packs directly. A KingSong KS-16X, for example, shows about 0.3 A of its own electronics while its charger pushes more than 2 A into the pack. So EucBuddy works the charge current out from the plug: plug watts × 0.88 (a typical charger's efficiency) ÷ pack voltage. With 236 W and 98.4 V that is about 2.1 A; the wheel's own reading is used instead whenever it agrees with that figure. The estimate is shown with ~, and it is only as good as the plug's watts (Section 10.3).
Switching off at a level
- The wheel's battery must hold the level for 3 seconds. A wheel that is already at or above it when charge control starts is switched off too.
- Only the wheel picked in Charge setup → Wheel counts. With no wheel picked, the connected one does.
- EucBuddy only ever switches the plug off, and only once per charge. It sends one request at a time and waits for each to be carried out, even on a slow link. After three requests the plug didn't obey, or 5 minutes without confirmation, the page shows cut fail (a late confirmation still counts).
- Left the page for more than a minute while a switch-off was still on its way? Nobody watched the plug, so that switch-off is forgotten. When you come back, a plug that is on is switched off again once the level holds; one you switched off yourself is simply left off. A switch-off you cancelled with B stays cancelled.
- Want to top up anyway? Press B to switch the plug back on (it also cancels a switch-off still on its way). EucBuddy won't switch it off again for this charge, even if the page reconnects. It arms again when the wheel reads 5 % below the level: a new charge.
- It needs a live wheel reading. Without one, or if WiFi, the plug or EucBuddy goes away, the plug simply stays as it is: on. The worst case is a full charge, never a plug left in an unknown state.
- Wheel speed plays no part: only the battery level acts.
- On the home network it keeps working after you leave the page, and with the screen dark in Power save. The Charge page and a running plug session never power EucBuddy off by themselves.
Switching off at a voltage
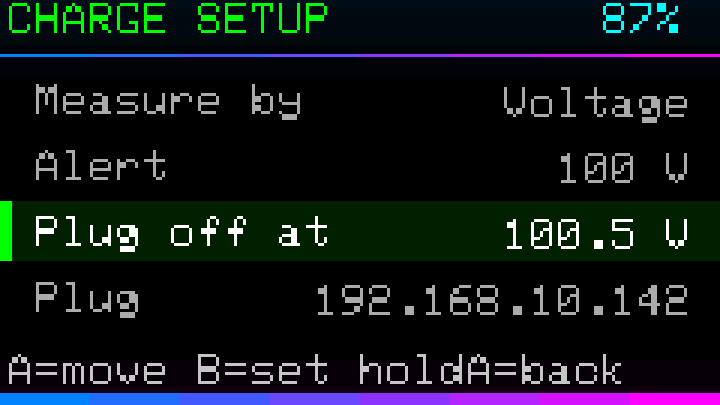
A wheel whose battery percentage is coarse or jumps on the charger can be cut on its pack voltage instead. Set Measure by to Voltage and choose Plug off at; the Alert row is then a voltage too, set the same way, and fires once when the pack holds it for 3 seconds (a pack already there when watching starts does not alert). Switching to Voltage with no alert voltage yet starts it at the Plug off at voltage. Everything in Switching off at a level above applies the same way: the voltage must hold for 3 seconds, the plug is switched off once per charge, and topping up with B is not fought.
- On EucBuddy, B adds 1 V; hold B to step fast. After 200 V it wraps to Off. From Off it starts just above what the wheel reads now (40 V with no wheel), so stepping up never stops on a voltage the pack already holds.
- For a precise value, use the WiFi panel: Charge → Smart plug → Switch off at takes 40–200 V to 0.1 V (say 100.5). On EucBuddy, B then goes on to the next whole volt.
- It needs a wheel that reports its pack voltage. Without a live reading the plug stays on.
- The voltage is measured while charging, so it reads a little higher than the same pack at rest. It arms again when the wheel reads 5 % below the set voltage (95 V for 100 V): a new charge.
Switching off by timer
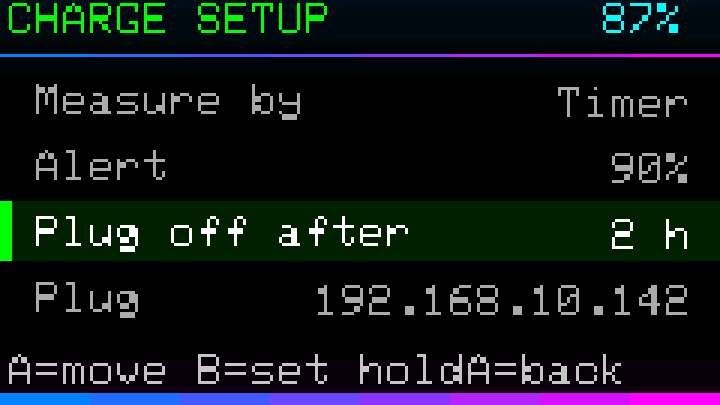
Prefer a fixed charging time, or can't connect the wheel? Set Measure by to Timer and choose Plug off after. The clock starts each time the plug turns ON, and when it runs out EucBuddy switches the plug off, with the same popup and beep.
- It needs no wheel. It can count on running to the end because the Charge page and its plug session never power EucBuddy off.
- The timer lives in EucBuddy's memory: restarting EucBuddy starts it again. A dropped link, or leaving and reopening the page within a minute, does not; changing the time does. Away from the page for longer (with WiFi on, leaving it ends the plug link), nobody watched the plug, so the clock starts again from the full time when you come back.
- Switched off by hand before the time is up? The clock stops; the next time the plug turns on it starts from the full time. The same after the timer switched it off: switching it back on gives a new full period.
In the WiFi panel
The panel's Charge page (Section 9) has three cards:
| Card | What's there |
|---|---|
| Now | The wheel (battery, volts, charge current, with ~ when it is worked out from the plug, which the note under the card then says) and the plug (ON/OFF, W, V, A), Switch on / Switch off, today's energy, and a calibration note when the plug's readings disagree. |
| Smart plug | Address with Save address; Find on network lists the Tasmota devices it finds (up to 8; a note says when there may be more), each with Use, and the saved one reads Saved. Nothing is saved until you press Use. Meanwhile EucBuddy shows the same progress popup and ends with Plug found … choose it in the portal (or already saved) or N plugs found. While EucBuddy runs its own search, the panel answers Buddy is searching for its plug; try again when it finishes; Measure by (Battery level / Voltage / Timer; it also sets whether the charging-screen alert is in % or volts), then Switch off at (Never, 50–100 %), Switch off at in volts (40–200 V to 0.1 V; empty = never) or Switch off after (Never, 30 min–8 h). The Now card shows the time left. |
| Charging screen | View (Battery / Weather / Control), Watch a wheel and Alert at (Section 10.1): levels in %, or with Measure by on Voltage one voltage (40–200 V to 0.1 V). |
If it doesn't work
- No plug found: some routers hide devices from each other. Type the plug's address in the panel instead.
- no answer: is the plug powered and on the same network? Did its address change? Reserve it in the router.
- Slow or flickering readings: the 2.4 GHz channel may be crowded. Put your router on whichever of channels 1, 6 or 11 the neighbours use least; two of your own access points on the same channel slow each other down. (EucBuddy's own access point picks the quietest of those three by itself.)
- Wheel shows only a fraction of an amp: see Charge current and the “~” above.
Plug calibration
A Tasmota plug measures with a small metering chip that is calibrated per plug. Cheap plugs are often sold uncalibrated, or lose it when they are re-flashed, and then report nonsense: the plug this feature was built with said 33 V on a 230 V socket. EucBuddy checks the three readings against each other and, when they can't all be true, shows needs calib. instead of volts and amps. The WiFi panel names the readings that disagree.
| EucBuddy flags it when | Because |
|---|---|
| Voltage below 90 V or above 265 V | No mains supply anywhere reads like that. |
| Power above volts × amps (by more than 15 % + 3 W) | Real power can't exceed apparent power. |
| 10 W or more with no current, or no voltage | Power needs both. |
Calibrate it in Tasmota
- Open the plug's own page in a browser (its address, for example http://192.168.10.142) → Consoles → Console.
- Plug a known resistive load into it and switch it on: a kettle, a heater or an incandescent lamp. Not the wheel charger: its power factor makes watts differ from volts × amps. Wait about 10 seconds.
- Voltage: type
VoltageSet 230with your real mains voltage (measure it, or use your nominal 230 / 120 V). - Power: type
PowerSet 2000with the load's real wattage (its rating, or better, a measured value). - Current: type
CurrentSet 8696in milliamps: watts ÷ volts × 1000. For 2000 W at 230 V that is 8696. - Check:
Status 8should now show matching voltage, current and power. EucBuddy shows mains volts and amps again within a few seconds.
Battery, sleep & power-off
Device battery
- EucBuddy's battery is shown top-right (% or V — the Battery option).
- The percentage is a smoothed estimate tuned to the battery's real discharge curve, so it stays steady and counts down evenly instead of jumping around or dropping fast under load.
- On T-Display-S3 the reading is unavailable on USB and while settling after unplugging; an unavailable value does not mean an empty battery. See Section 10.
- At a low level the device warns you (with sound on speaker-equipped hardware).
- At a critically low level it powers off with a "battery depleted" notice (except on the charging screen) — plug in USB-C.
Sleep & wake
- After the inactivity timeout (Auto-sleep) the device sleeps. A button press resets the timer — riding doesn't. Using the WiFi panel counts too, and a CSV download keeps the device awake until it finishes (Section 9).
- Power save turns off the screen but keeps the wheel connection and ride logging active. Press A or B to bring the screen back.
- Power off disconnects. Wake StickS3 with PWR, T-Display-S3 with A or B; it then reconnects and resumes the trip without resetting the counter.
- It also comes back to the ride screen you were last on — not the first one — after a connected sleep or reconnect. (If you'd since hidden that screen, it falls back to the first one.)
If the wheel link drops mid-ride
When the Bluetooth link drops unexpectedly while a ride screen is showing (even with the screen dark in Power save), EucBuddy doesn't end the ride: it shows “Reconnecting” and tries to get the same wheel back for up to 30 seconds. If it succeeds, the same ride carries on, on the same screen, with the connect chime. If it can't, the ride is saved and you're back on the scan list, with a “Link lost” note saying why. (Firmware 0.5.08 or later.)
Cancelling the reconnect
While EucBuddy is reconnecting — after a wake or a mid-ride drop — you'll see “Reconnecting” with B = cancel reconnect along the bottom. Useful when you've walked away from that wheel, or want to hop onto a different one straight away.
- Press B — a “Cancel reconnect?” popup appears. A second B stops trying and takes you back to the scan list; A closes the popup and carries on. Ignore it and it disappears by itself after 10 seconds, reconnecting as usual.
- The reconnect keeps working underneath the popup — deciding to continue costs you nothing.
- A button you were already holding when the screen appeared is ignored, so waking the device with a long press can't cancel anything by accident.
- Cancelling doesn't throw your ride away. Pick the same wheel from the scan list within about ten minutes and the ride carries on where it stopped; pick a different wheel and the old ride is closed and saved first.
Power off
- On StickS3, press PWR while running — the screen goes dark and it switches off. Press it again to start up.
- On either board use menu → Settings → Power off, or the WiFi panel's power-off button. Normal shutdown saves pending data; suddenly removing battery power is not equivalent.
- Switching off while connected to a wheel keeps your place: the next start reconnects to that wheel and resumes the ride, exactly like waking from sleep.
- StickS3 on a charger cannot cut its own power while USB is feeding it, so it goes dark and quiet instead. A or B brings it back; pull the cable and it is properly off.
- T-Display-S3 can enter deep sleep even on USB. A or B wakes it. Avoid holding B across a reset unless deliberately entering the USB flashing mode.
Rides — your ride history
EucBuddy logs every ride automatically. Each entry records the wheel, start & end battery, the voltage range (min–max), top speed, peak current, max PWM (highest motor load — see Section 4), distance, the ride time, the energy used (Wh), the odometer at the start, how many times the device slept mid-ride, and the max temperature. A ride is saved whenever you disconnect or the wheel goes out of range.
On the device — the Rides viewer
- Open it from the carousel (Rides). It works like MyBuddy — a separate screen.
- A scrolls the list (newest first); B opens a ride's details — three big fields at a time across four pages (press A to flip pages, B to close). Time and Energy sit on page 3, next to distance.
- Hold B to delete — all rides from the unfiltered list, or this ride when its details are open (each asks to confirm). Opened from a wheel in My Wheels, hold B on the list does nothing, so it cannot wipe other wheels' rides. Hold A for the main menu.
In the WiFi panel
- The Rides page lists everything with room to scroll back through older rides. Each row shows battery, top speed, peak current, distance, time, Wh, sleeps and max temperature at a glance.
- Tap a ride for a details pop-up; edit any value by hand — including ride time (mm:ss, or h:mm:ss past an hour) and energy — add a ride manually, or delete one. Clearing a time or energy box marks that value as “not measured”.
- Download CSV to keep or analyse your whole history on a computer — the export includes ride_seconds and energy_Wh columns.
Firmware updates
New firmware adds wheel support and features. Updating happens in your browser — no software to install.
| Step | Do this |
|---|---|
| 1 | On a computer (Windows, macOS, Linux or ChromeOS), open the flasher in Chrome, Edge or Opera. Phones and tablets can't install firmware. |
| 2 | Connect EucBuddy with a data-capable USB-C cable and select the exact board: M5Stick-S3 or T-Display-S3. |
| 3 | Choose an available firmware channel and follow the prompts. Keep USB connected until flashing finishes. If no port appears, expand the flasher's connection help for your selected board. |
| 4 | First install only: if the device isn't licensed yet, a popup asks for your licence code (from your purchase email) and a nickname. Each code activates one device, once; later updates of that device need no code. |
Your settings and remembered wheel are kept across updates.
The flasher also has an optional Configure WiFi tick box. Fill in your home network's name and password there and EucBuddy stores them, so it can join your own network instead of making its own hotspot — see Connections in Section 6. The same box has a City field with live search for the weather screen (Section 8) — optional, and changeable later in the WiFi panel. Nothing you type there is sent to our servers; it goes straight to the device over USB.
FAQ
Where is Zap Dash?
Open MyBuddy, hold B, then select Zap Dash with A and enter with B. If the selector is missing, check Info for your firmware version. See the game guide for controls, supported versions and why standard LilyGO hardware plays silently.
The wheel scan stops when I open the WiFi panel
With no wheel connected, discovery pauses for as long as EucBuddy's access point is on. Turn WiFi off to scan again. Existing wheel links are preserved.
A “Link lost” message appeared
The second line reports why the connection ended, such as a telemetry timeout or a Bluetooth disconnect reason. Note that text and your firmware version when reporting a problem; the message alone does not identify a wheel fault. Deliberate disconnections do not show it. On a ride screen EucBuddy first tries to reconnect for up to 30 seconds (Section 11); the message appears only if that fails.
My wheel isn't in the list
Make sure it's on and nearby. If the list is cluttered, enable Only EUC. Re-detection can take a few seconds.
A wheel shows up as "EUC"
Some wheels (Begode and other HM-10 modules) broadcast their name a moment after they first appear, so they read EUC until the name arrives, then fill in. EucBuddy remembers names it has already seen, so this is brief. ★ Star the wheel to always show its name.
The voltage looks wrong (Begode)
Set Begode V in the menu to match your wheel's pack voltage (e.g. 84 V, 100 V, 134 V). Newer Begodes with a smart BMS report their true voltage automatically and don't need this.
The headlight doesn't respond
With Press B set to Light (the default), a short B on Dashboard, Custom 3, Power or Custom 1 toggles the headlight on wheels that support it (KingSong, Begode, Veteran, Nosfet, InMotion). Trip and Stats still reset. If you set Press B to Horn, short B is the horn instead.
The device keeps switching off
That's auto-sleep. Increase the time or turn it off in Auto-sleep. Sleep is disabled while charging.
The WiFi panel won't open
In Access point mode, join EucBuddy's hotspot and browse to http://192.168.4.1. In Home WiFi mode, open http://eucbuddy.local from the same home network, or the numeric address shown in Connections → Info.
The charging screen never finds my wheel
The wheel has to be switched on while it charges, within Bluetooth range, and not connected to the phone app. It must also be selected in Charge setup → Wheel. See Section 10.1.
My wheel reached 100 % but nothing happened
Check Charge setup → Alert isn't Off. Levels the wheel had already reached when the charging screen started are skipped on purpose, and each level alerts only once per charge.
The Charge page says “needs calib.”
The smart plug's voltage, current and power don't add up, so EucBuddy won't show them as fact. Calibrate the plug in its Tasmota console: Section 10.3.
My wheel shows 0.3 A while charging, but the charger pushes 2 A
The wheel measures its controller, not the charge port. The Charge page works the charge current out from the plug instead and marks it ~: Section 10.2.
PWM shows "--" or "set calib"
Your wheel doesn't report PWM directly, so EucBuddy can't show it until you give the wheel a one-time PWM calibration in My Wheels (spin speed + voltage — Section 6). After that it estimates the duty from speed and voltage, tagged "PWM est" — a useful guide, not exact. Wheels that do report PWM (many Veteran, Begode, InMotion) show the precise value with no tag and need no calibration.
Where is the PWM screen?
It's Custom 3: out of the box it shows PWM big, with speed and voltage beside it. You can swap any of those three values for something else under Dashboard setup → Dashboard config (Section 6).
How do I disconnect from my wheel?
Hold A for the menu. While a wheel is connected, Disconnect is in the carousel; from a ride screen it is already centred, so it's one press of B away.
Where are my rides?
On the device: menu → Rides. With more room: the Rides section of the WiFi panel, where you can also edit, add, delete and export them (Section 12).
It's reconnecting to a wheel I'm not riding
Press B on the “Reconnecting” screen and confirm with B again — you go straight back to the scan list and can pick another wheel. A (or just waiting 10 seconds) keeps the reconnect going. Section 11.
I cancelled the reconnect — did I lose the ride?
No. Choose the same wheel from the scan list within about ten minutes and the ride continues where it left off. Choose a different wheel and the old ride is closed and saved as its own entry first.
Time or Energy shows “--”
That ride has no measurement for it — it was recorded before the feature arrived, added by hand in the WiFi panel, or the field was left empty there. A dash means “not measured”, which is why it isn't shown as 0. New rides fill both in automatically (Section 4).
My ride history is empty after updating
Only an update from firmware older than 0.3.17 does this: that release changed the stored ride format, so the log was cleared once. Settings, favorites and calibrations were kept.
The weather screen says “No WiFi”
No home network is stored yet. Put one in with the web flasher's Configure WiFi box (Section 13) or the Home WiFi card on the WiFi panel's Connections page (Section 9). Remember it has to be a 2.4 GHz network. Section 8.
The weather shows the wrong city
The built-in default is Warsaw. Change it on the WiFi panel's Weather page (or the flasher's City field) — the clock follows the city too, so it moves with it. Section 8.
The forecast strip disappeared
All four forecast steps are unticked on the panel's Weather page — that's the setting for hiding it. Tick any of +1h / +2h / +4h / +8h to bring it back (Section 8).
There's a small orange “!” on the weather screen
The last refresh failed, so what you're reading is a little old. Everything stays on screen and it keeps retrying by itself — the mark clears the moment a fresh forecast lands. Section 8.
Voltage, current and PWM are all “--”
If you connected to EUC World on your phone rather than straight to the wheel, the app's link simply doesn't carry those three. Speed, battery, distance, temperature and energy all work. Connect to the wheel itself for the rest (Section 2).
It switched off when I pressed the power button
On StickS3, PWR both turns it on and switches it off. On T-Display-S3, the reset key is handled as a sleep request during normal operation; wake with A or B. If a wheel was connected, the device reconnects and resumes the ride (Section 11).
It says “Storage full” when it starts
The settings memory has filled up and saving has stopped working, so new settings and rides wouldn't stick. Export what you want from the WiFi panel, then run a Factory reset (Section 6). Section 11.
Questions? Message us on facebook.com/eucbuddy — happy to help.